Account Configuration & Initial Setup
Getting your integration configured
The Stripe Connector for NetSuite (SuiteSync) is not a self-serve product and must be configured through our service channel. We provide the information below for clarity on what steps are taken during onboarding, and for you to prepare your accounts to make the onboarding process smoother. Reach out to sales@suitesync.io, submit a form at suitesync.io, reach out to Stripe directly at sales@stripe.com or submit a form at stripe.com/contact/sales to get this process started!
What you'll need
- An activated Stripe account. In order for us to connect securely to your Stripe account, it must be activated.
- A NetSuite account for testing the integration. A sandbox is recommended, but a production account can be used.
- NetSuite user credentials (for connecting to your NetSuite account).
Setting up a NetSuite User
After connecting your Stripe account, you'll need to enter your NetSuite sandbox credentials. You'll need to have the following information handy:
- NetSuite Account ID. Navigate to the SuiteTalk preferences via “Setup > Integration > Web Services Preferences” to find this ID.
- NetSuite token ID.
- NetSuite token secret.
The NetSuite user:
- Should be for your sandbox environment. Production credentials can be provided later.
- Must be enabled for Web Services use. Here's more information on setting this up.
- Has access to the administrator role, or has all required permissions (more details below).
- Should be a dedicated account for this integration. This ensures that there is a clear audit
trail for everything translated by the integration.
If you do not provide a user with the administrator role, or do not provide a user with GUI access,
troubleshooting issues specific to your NetSuite account will be time consuming. It's best to start
with administrator and GUI access, and then scope down permissions before moving to production.
How to set up a NetSuite user
Here's a guide to creating a NetSuite user for the integration:
-
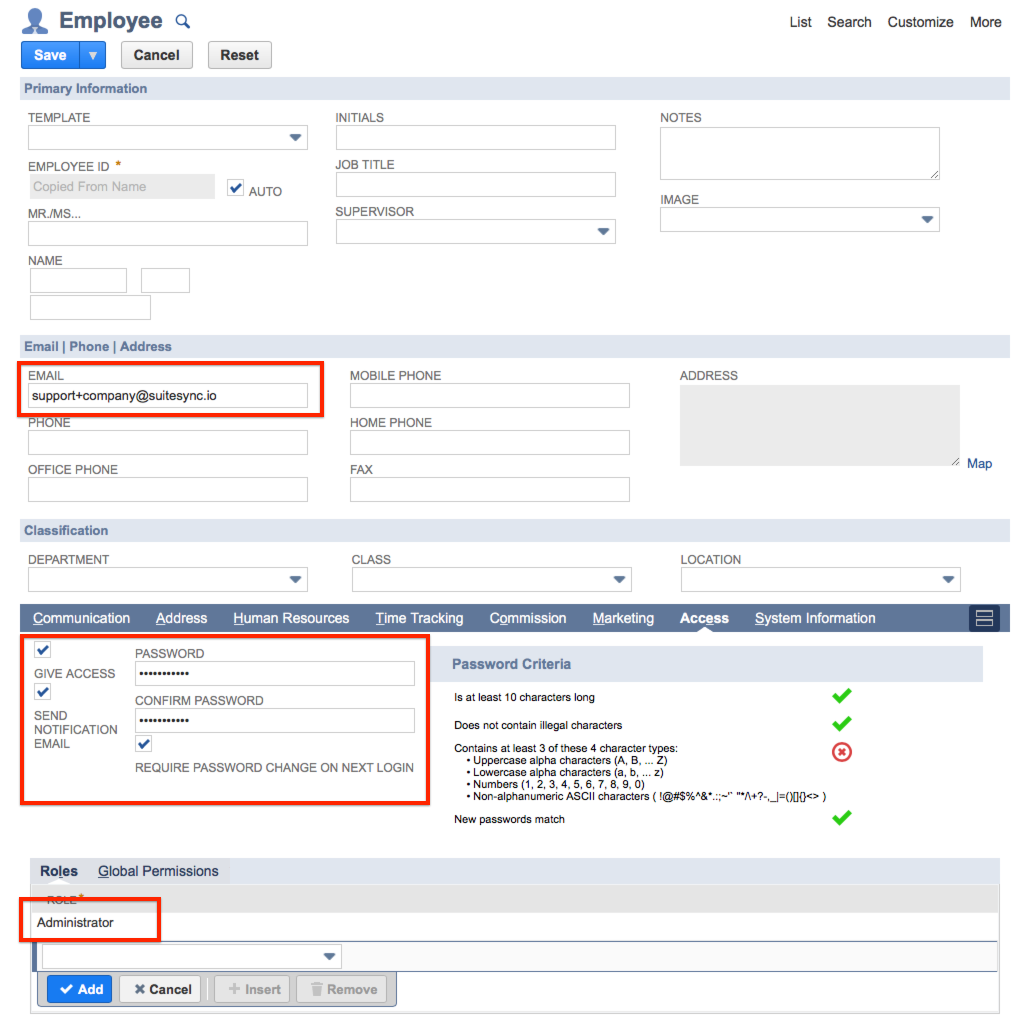
Create a new employee record. Plug
page:new employeein the global search. - Set the email to the address that SuiteSync support sent you. Do not use support@suitesync.io or another generic address.
- Check "Give Access" and set a default password
- Add the Administrator role or the "SuiteSync Limited Access" role
- Press save and email the temporary password you set to SuiteSync.
Here's a screenshot of what the create employee page should look like:
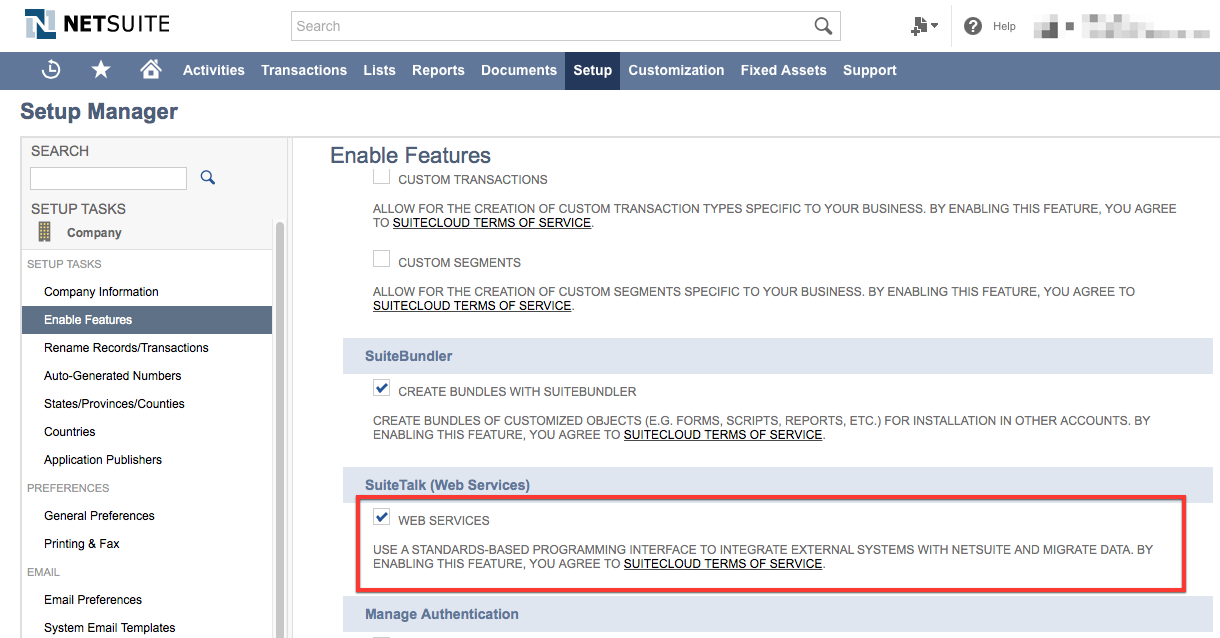
Enabling NetSuite Web Services
NetSuite WebServices is the feature used to facilitate the integration between Stripe and NetSuite. If integrations have not been used in your NetSuite account before, you may need to enable this feature.
- Navigate to 'Setup > Company > Enable Features > SuiteCloud > SuiteTalk' and enable "Web Services"
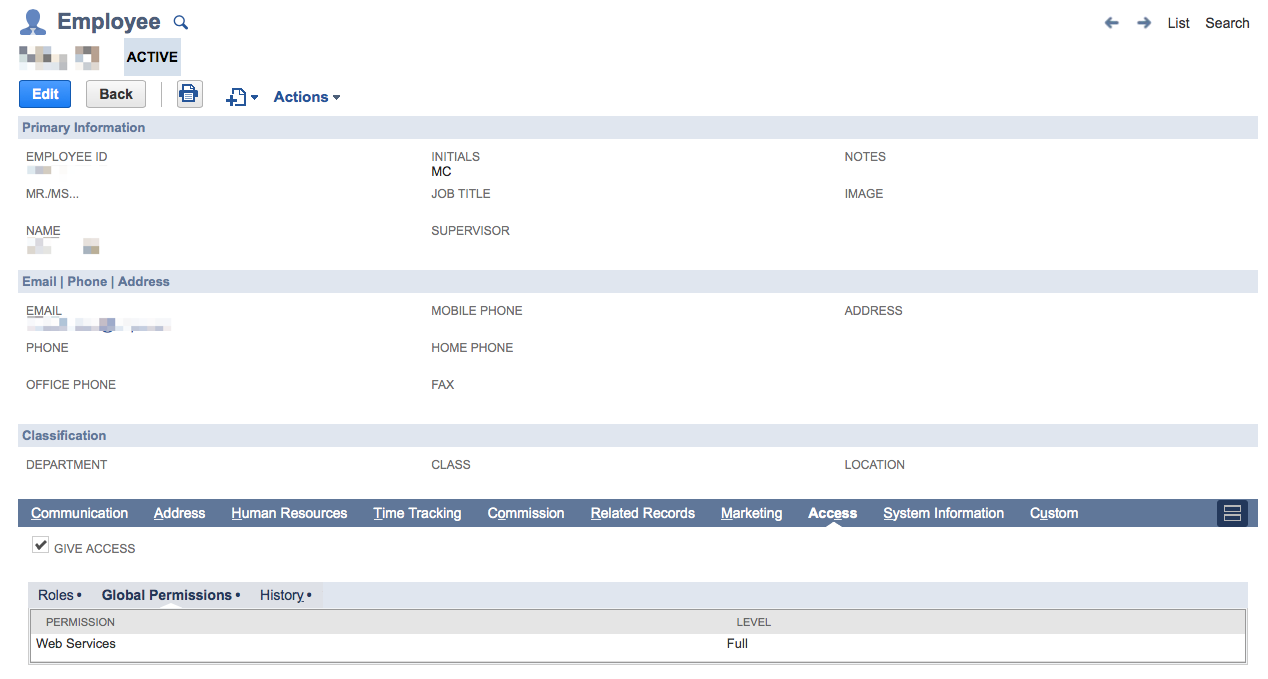
- If the user does not have the "Administrator" role, you'll need to add the "Web Services: Full" permission to either the user directly or the role that the user has access to. Here's how to add the permission to the user:
- To add the permission directly to the user, navigate to "Employee > Access > Global Permissions" and add the "Web Services: Full" permission
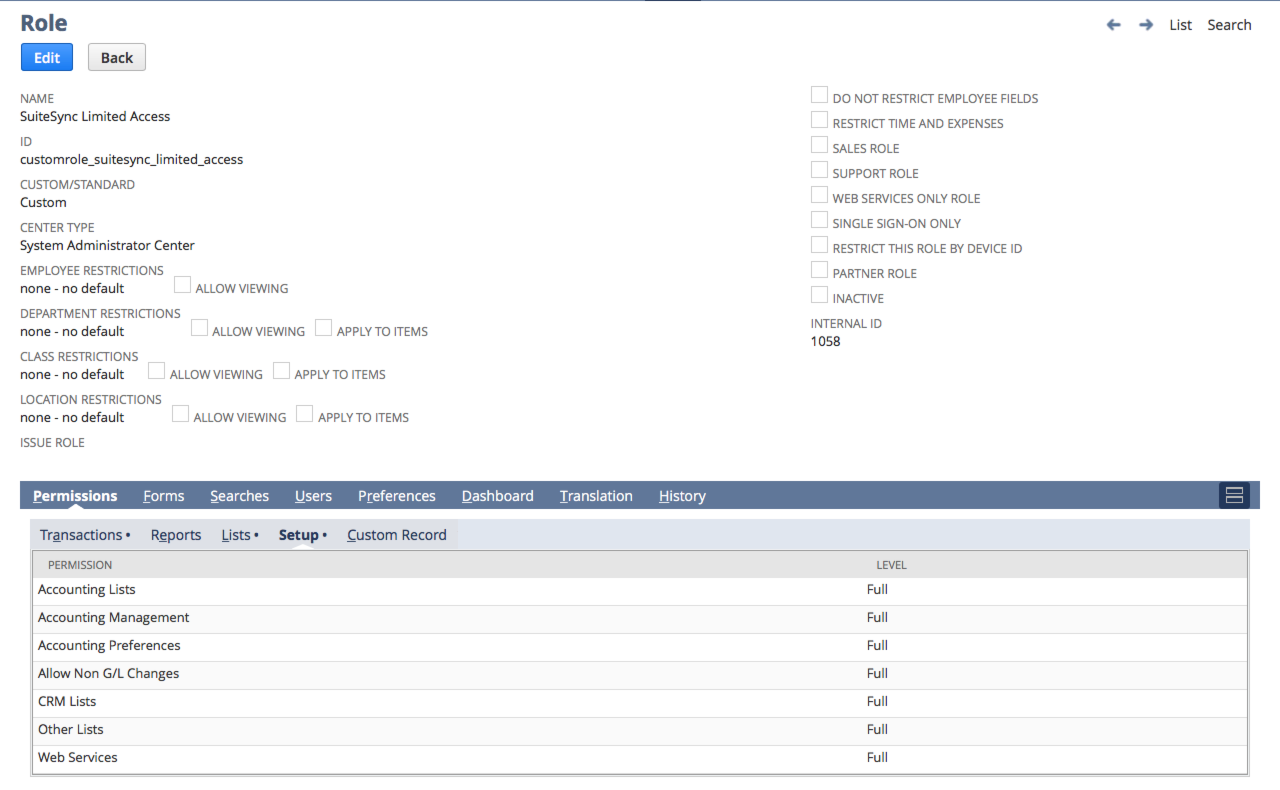
- To add the permission to the role, edit the role associated with the user, navigate to "Permissions > Setup" and add the "Web Services: Full" permission
Here's exactly where you enable the web services feature:
Should I use a dedicated user for the integration?
It's recommended to use a dedicated user. Here's why:
- Changing the configuration on a shared user can affect the Stripe-NetSuite integration.
- NetSuite logs each change in NetSuite in the "System Log". If a dedicated user is not used it is harder to determine
However, the integration works just fine with a shared user if these issues aren't important to you. If you chose to use an existing user's login, be sure that no other integrations are using that login.
Do I need a NetSuite sandbox to use this integration?
No, we can configure and test integration directly in your NetSuite production environment. However, any test data that is created in your production environment needs to be manually deleted from your NetSuite production account.
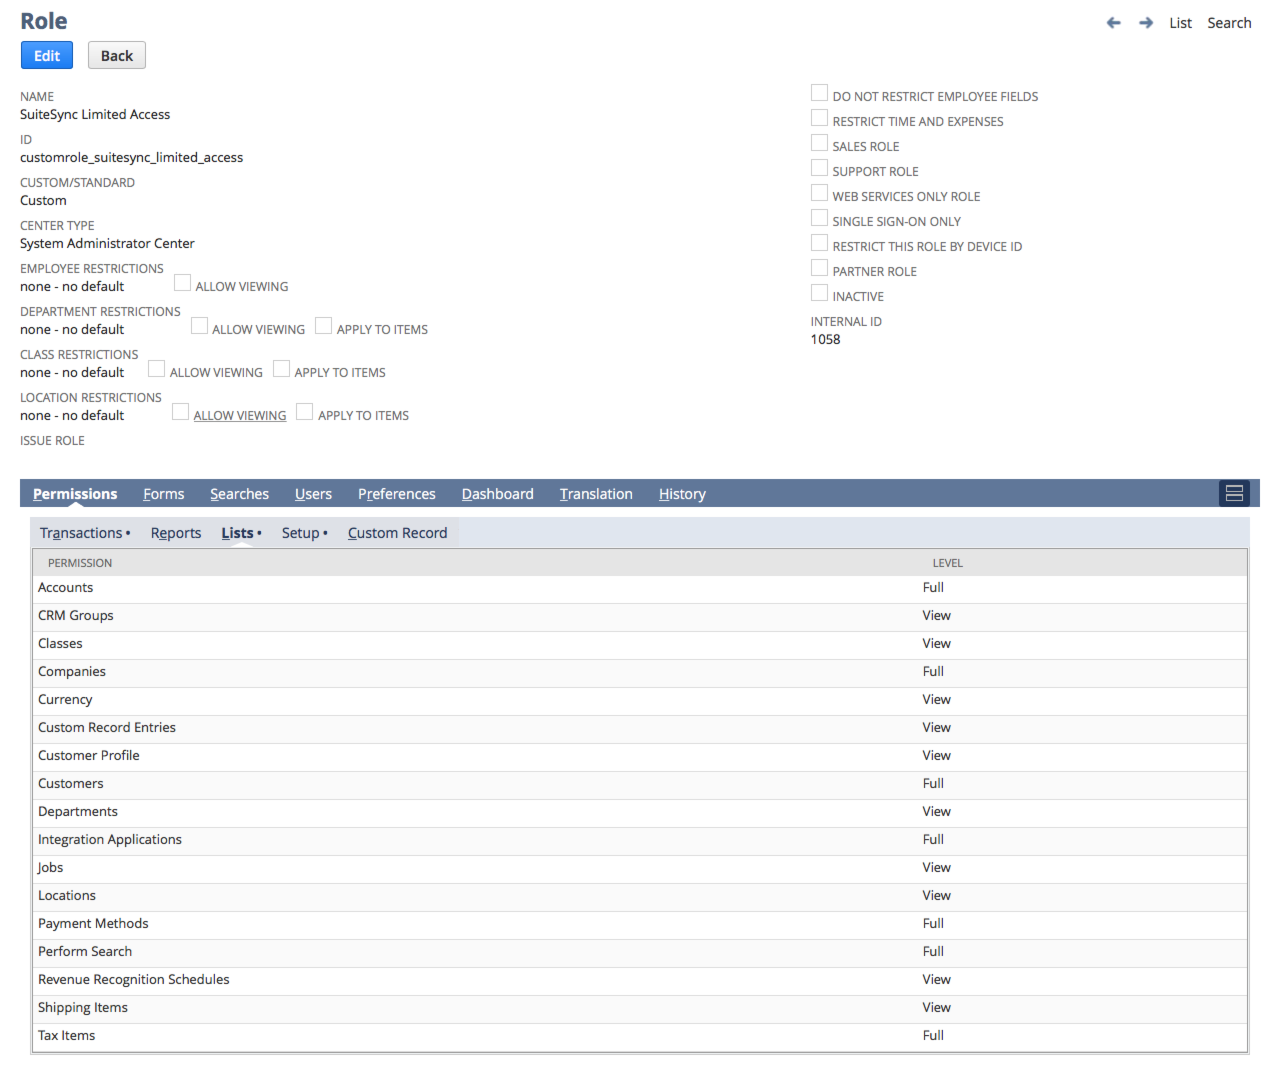
Limited User Access
When we setup your integration we scope the permissions required down to the minimum required set. Here are the minimum set of permissions required for the integration. We set this up for you during onboarding, so you don't need to worry about configuring permissions, but we're listing them here for your information.
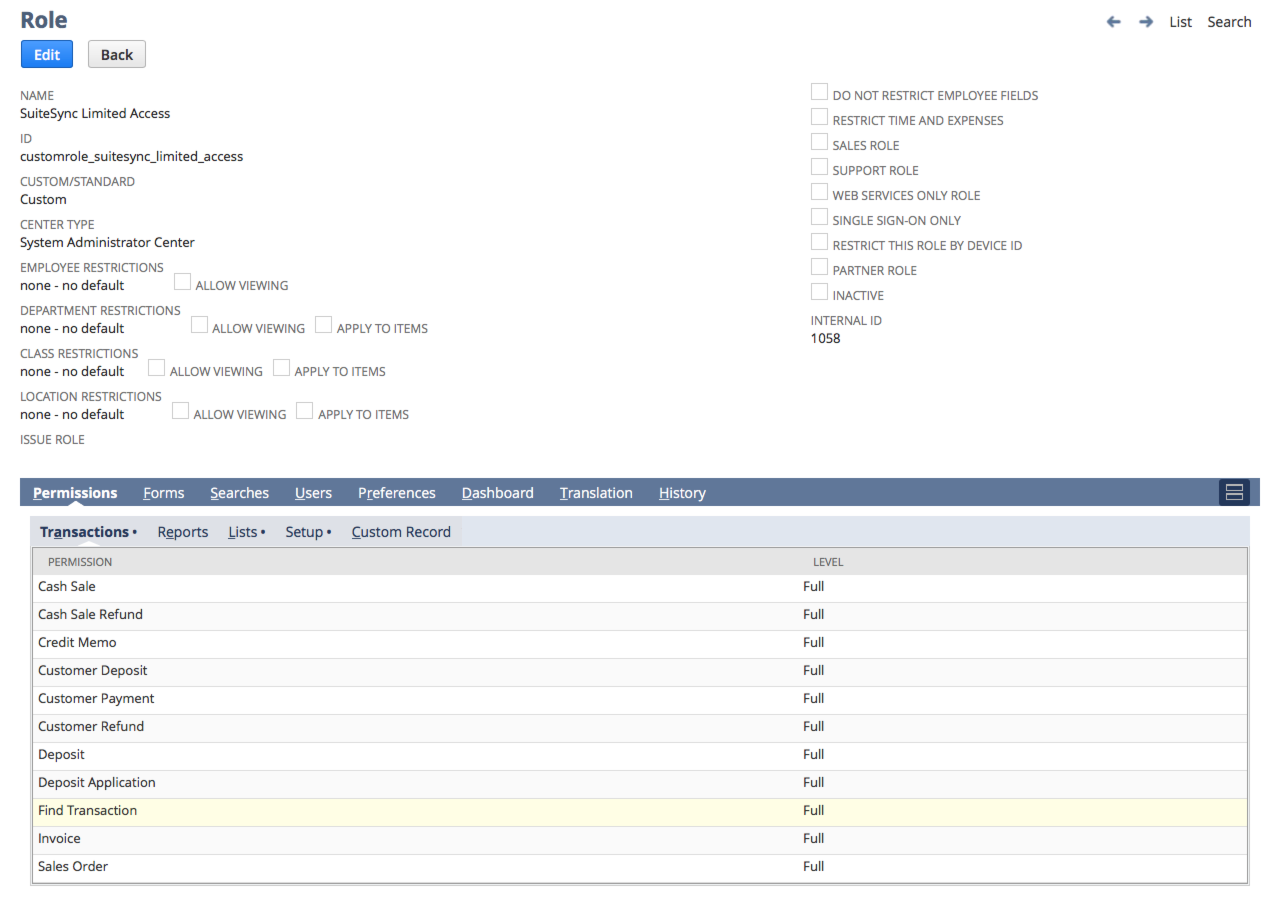
Depending on your exact integration configuration is may be possible to further decrease the permissions required for the integration to work properly.
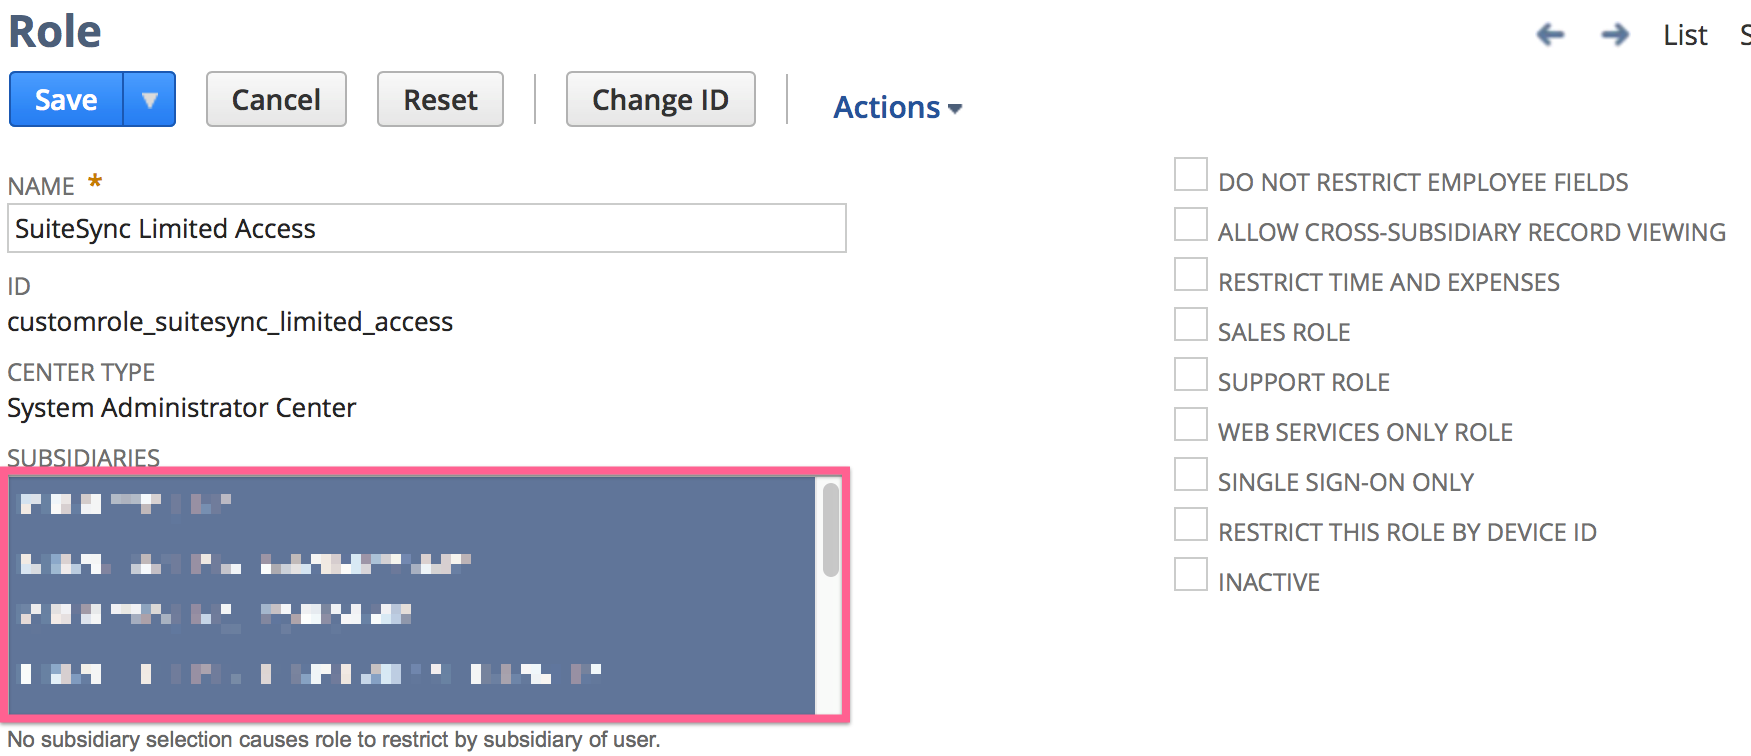
Setting up the limited access role to function with multiple subsidiaries
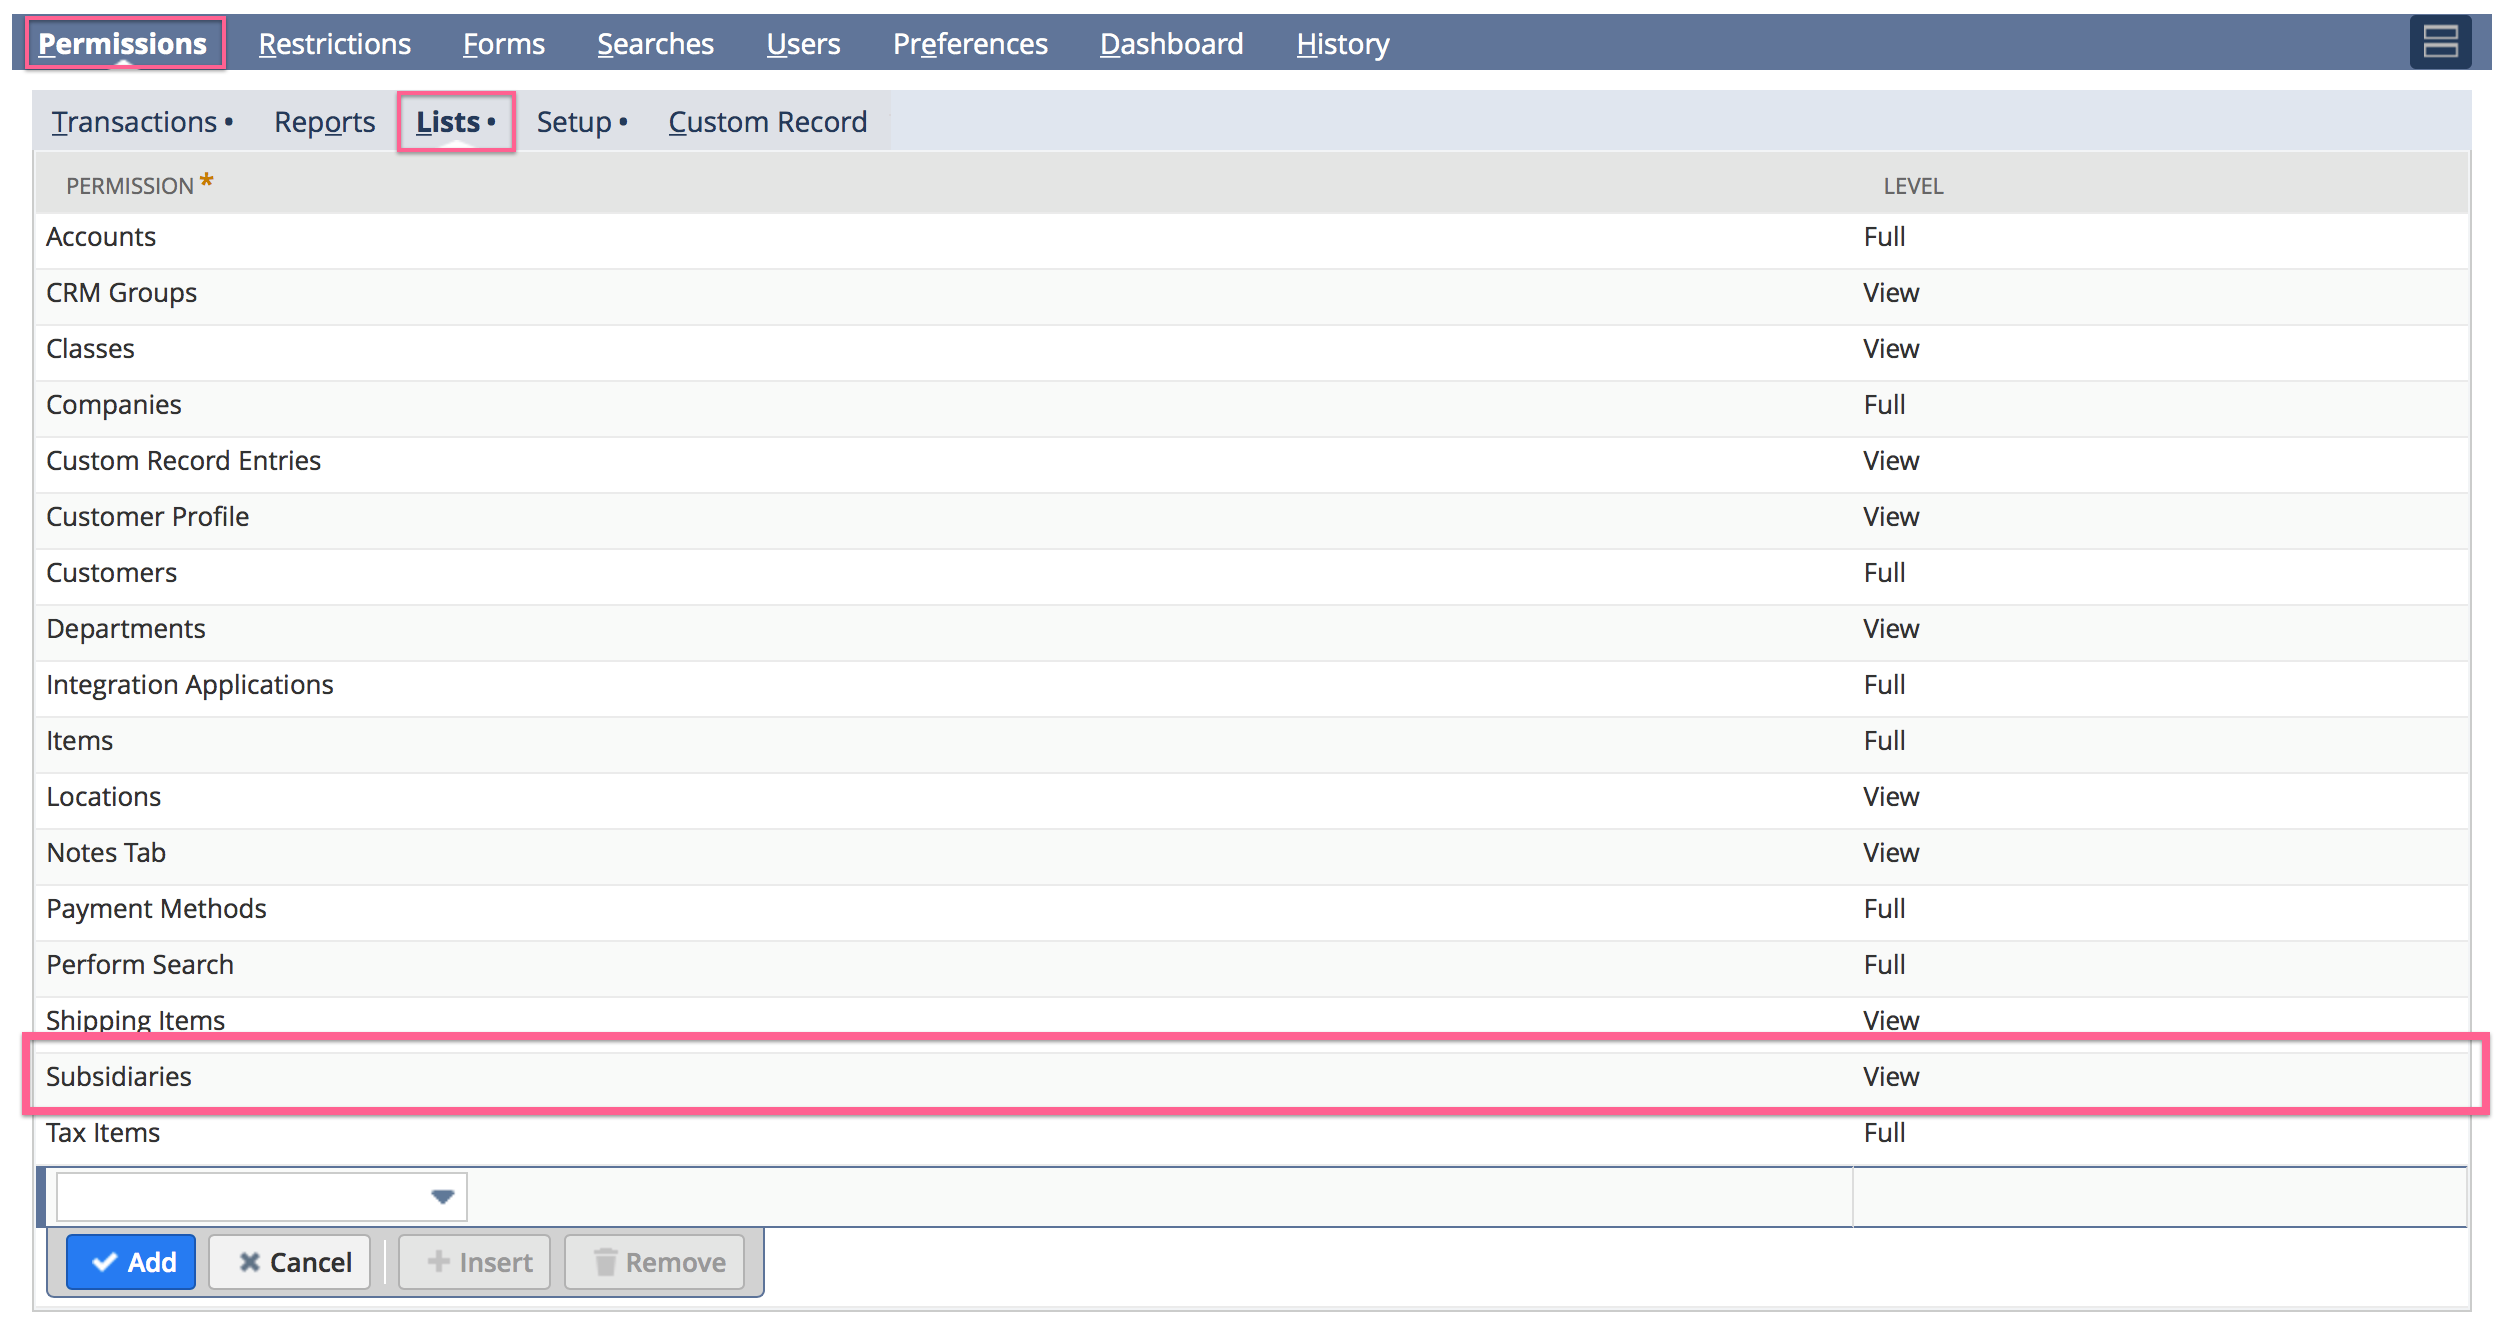
If you have NetSuite OneWorld enabled (i.e. multiple subsidiaries) on your account, you'll need to add the 'Lists > Subsidiaries: View' permissions to the "SuiteSync Limited Access" role (i.e. the role that we use to connect to your NetSuite account).
If you are using our payment link functionality or manual payments inside of NetSuite across multiple NetSuite subsidiaries and multiple Stripe accounts, you'll need to add these permissions to each role that will be using this functionality.
First, make the role explicitly available to all subsidiaries by selecting all subsidiaries on the header-level subsidiary field on the role. Here's where the role is made accessible to all subsidiaries:
Next, navigate to the 'Manage Roles' page by searching for page: roles. Then edit the role(s) you need these permissions on.
Here's where you'll add this permission:
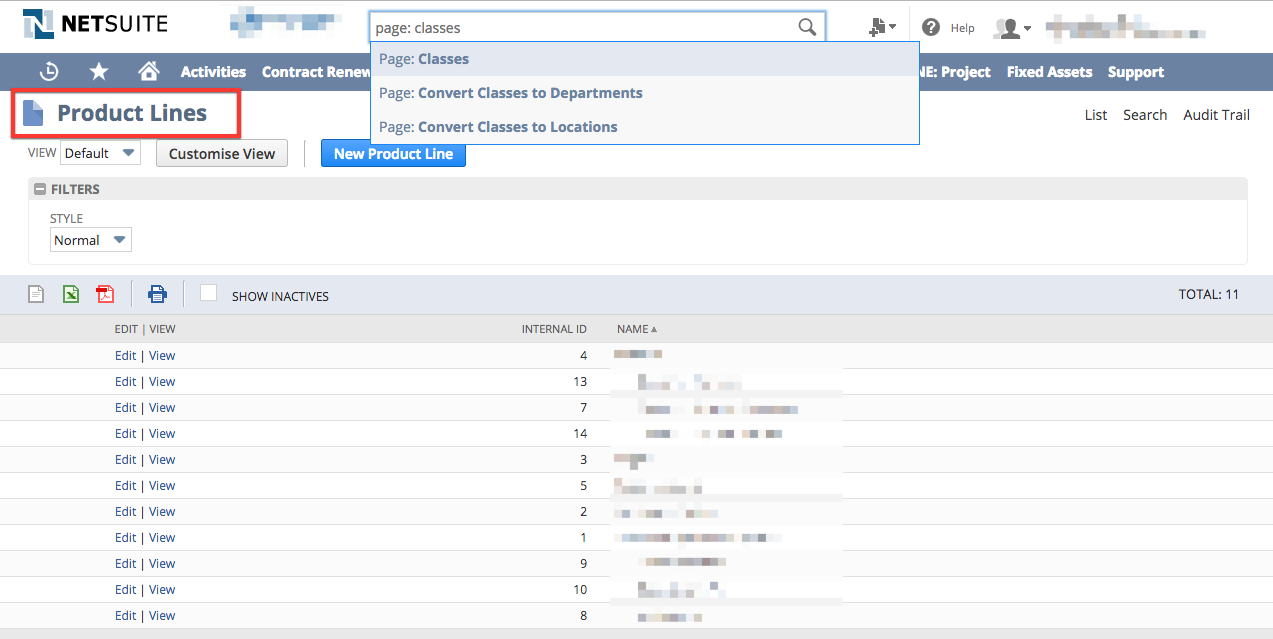
I can't find a permission shown in the NetSuite list above
If you can't find some of the permissions shown above in your NetSuite account, it's possible that the records were renamed. The easiest way to see if a NetSuite record was renamed, is to search for the original record name in the global search and inspect the name on the resulting index page.
For instance, if you cannot find the "Classes" permission, most likely the "Class" record's name has been renamed. To discover the new name, run a global search for "page:classes" and click on the first result. The title at the top of the page is the new name for "Class". This is the title of the record that should be in the 'Lists' permission area.