NetSuite Configuration
For some workflows and configurations, there are NetSuite configuration changes that need to be made. Here are some details about how to make these configuration changes on your NetSuite account.
General
How to Install a Bundle
As part of the SuiteSync setup process you may need to install a bundle. Here's how:
- Do a global search for
page: Search & Install Bundles - Input the bundle ID provided to you by SuiteSync
- Click on the name of the bundle
- Press install and follow the prompts. If you receive a message that you do not have access to the bundle, contact Suitesync support.
Setting Up Token Based Authentication
Token Based Authentication (TBA) is used to connect to your NetSuite account without a email and password (the previously standard way of connecting to a NetSuite account).
In order to login using tokens, there are two groups of tokens (i.e. keys) needed:
- Consumer Tokens. These are tied to an "Application Record" in NetSuite. You can view application records in your account by searching for
page: integrations - User Tokens. These are tied to a combination of a 1) User/Employee 2) Role and 3) application record. You can view user tokens by searching for
page: access tokens
Here's how to set up these two token groups:
- Make sure Token Based Authentication is enabled.
- Visit the features page of the setup area.
- Ensure the "Token Based Authentication" checkbox is enabled (Setup > Enable Features > SuiteCloud > Manage Authentication > Token Based Authentication). If it's not, enable it and press save.
- Install the "SuiteSync Token Based Authentication" bundle (ID 178262).
- Below are the exact permissions required for token based authentication on the role. These permissions are included on the "SuiteSync Limited Role" by default.
- Setup > User Access Tokens
- Setup > Access Token Management
- Setup > Log in using Access Tokens
- Installing this bundle creates pre-configured consumer tokens for SuiteSync. You don't need to worry about providing these consumer tokens to SuiteSync.
- Below are the exact permissions required for token based authentication on the role. These permissions are included on the "SuiteSync Limited Role" by default.
- Add the "SuiteSync Limited Access" role to the user you'd like to use for the integration. You do this by editing the employee record for the user and adding the role to the employee.
- Edit the employee you'd like to connect through
- Add the "SuiteSync Limited Access Role" to the "Access" tab. Then press save.
-
Create a user token. Search for
page: New Access Token.- Application Name: SuiteSync
- User: The user you'd like to use
- Role: SuiteSync Limited Access
- The token ID and token secret are what SuiteSync uses to connect your NetSuite account. Enter these into the SuiteSync dashboard or email these tokens to SuiteSync support.
- Note that these tokens are useless without the corresponding consumer tokens. The consumer tokens are generated automatically when you install the "SuiteSync Token Based Authentication" bundle and are only accessible by SuiteSync. In other words, you don't need to worry about sharing these tokens.
- If you have multiple subsidiaries in your account, you'll need to configure the "SuiteSync Limited Access" role to have subsidiary permissions. Here's a step-by-step guide.
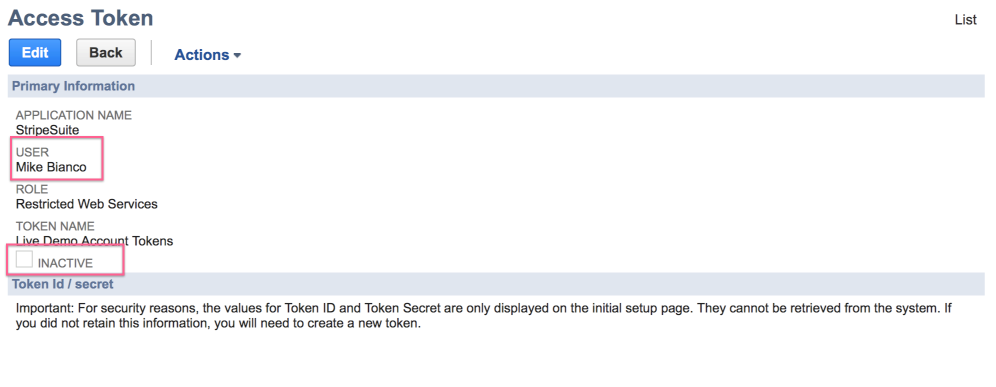
Determining Why a Token-based Login is Broken
Tokens are associated with a specific user. If that user is disabled, the corresponding token triggers a login error. The token could also have been marked as inactive, this would also trigger a login error.
Here's how to figure out which issue is occurring and how to fix it:
- Search for
page: Access Tokenin the NetSuite global search (here's a direct link) - View the token being used with SuiteSync. It will have the word "SuiteSync" in the name.
- If the token is inactive, reactivate it.
- If the token is active, check the user associated with the token. Ensure that the user/employee has "give access" enabled. Here's more information on how to setup a user properly.
- if the token is active, and the corresponding user has "give access" enabled, make sure the user also has the "SuiteSync Limited Access" role under their role list.
Here's where to look on the access token:
Viewing the Stripe ID on the NetSuite record
For customers:
- Customization > Lists, Records & Fields > Entity Fields > New
- Label: "Stripe Customer ID"
- Type: "Free-form Text"
- ID:
_stripe_customer_id - Store value: unchecked
- Applies to: Customer
- Validation & Defaulting:
- Formula: checked
- Default Value:
{externalid}
For transactions:
- Customization > Lists, Records & Fields > Transaction Body Fields > New
- Label: "Stripe ID"
- ID:
_stripe_transaction_id - Type: "Free-form Text"
- Store Value: unchecked
- Applies to:
- Purchase
- Sale
- Customer Payment
- Deposit
- Validation & Defaulting:
- Formula: checked
- Default Value:
{externalid}
Creating a Stripe Dashboard Link
Below are instructions detailing how to create a link on various NetSuite records to provide a direct link to the Stripe dashboard. Alternatively, you can install these links using the "SuiteSync Dashboard Links" with ID 170196.
Customer link:
- Customers > Lists, Records & Fields > Entity Fields > New
- Configure field:
- Label: "Stripe Dashboard Link"
- ID:
_stripe_dashboard_link - Type: Hyperlink
- Store value: unchecked
- Applies to: Customer
- Link Text: View on Stripe Dashboard
- Display > Subtab: Main
- Display: Display Type: Disabled
- Description: A link to the Stripe dashboard for SalesOrder, Invoices, CashSales, and CreditMemos
- Validation & Defaulting:
- Formula:
http://dashboard.stripe.com/customers/{externalid}
Transaction link:
- Customers > Lists, Records & Fields > Transaction Body Fields > New
- Configure field:
- Label: "Stripe Transaction Dashboard Link"
- ID:
_stripe_txn_dashboard_link - Type: Hyperlink
- Store value: unchecked
- Applies to: Sale
- Display: Display Type: Disabled
- Display > Subtab: Main
- Link Text: View on Stripe Dashboard
- Description: A link to the Stripe dashboard for NetSuite payments and refund records.
- Validation & Defaulting:
- Formula:
http://dashboard.stripe.com/payments/{externalid}
- Formula:
Adding the Customer ID on Transactions
On the sale transactions:
- Customization > Lists, Records & Fields > Transaction Body Fields > New
- Label: "Sale Stripe Customer ID"
- ID:
_stripe_sale_customer_id - Type: "Free-form Text"
- Store Value: unchecked
- Applies to:
- Sale
- Validation & Defaulting:
- Formula: checked
- Default Value:
{entity.externalid}
On payments and deposits:
- Customization > Lists, Records & Fields > Transaction Body Fields > New
- Label: "Payment Stripe Customer ID"
- ID:
_stripe_pymt_customer_id - Type: "Free-form Text"
- Store Value: unchecked
- Applies to:
- Customer Payment
- Deposit
- Validation & Defaulting:
- Formula: checked
- Default Value:
{customer.externalid}
Note that a single SQL formula in a field won't work. If you include a field that does not exist on the record in question NetSuite will return a ERROR: Field 'entity.externalid' Not Found even if the reference to that field is included in a WHEN statement that is never executed.
For example:
CASE
WHEN ({type}='custinvc' OR {type}='salesord') THEN
  {entity.externalid}
WHEN ({type}='custpymt' OR {type}='custrfnd' OR {type}='custdep') THEN
  {customer.externalid}
END
Creating the "Stripe Quote Payment Link" custom field
There are some cases where you'll want to give customer's the option of accepting payments on their account before a sales order or invoice is created. For instance, you may want to accept payment on the quote stage of the order lifecycle.
You can do this using the customer payment page. You can customize the default options on the page by adding query parameters to the URL.
You can install this field by using the bundle "SuiteSync Quote Deposit Link" with ID 218358.
Here's how to create a field on the quote (also known as the estimate record) in NetSuite which creates a page where the customer can send a payment for the quote amount containing the quote number:
- Label:
Quote Payment Link - ID:
_stripe_quote_payment_link - Type:
Hyperlink- You may want to change the type to free-form text if you are primarily using this form in templates (emails, pdfs, workflows, etc)
- Display > Subtab:
Main - Display > Display Type:
Disabled - Store value:
false/ unchecked - Description: "Allow customers to submit an unapplied payment to their account for the total of a quote with a reference to the quote #. Learn more: https://dashboard.suitesync.io/docs/netsuite-configuration#creating-the-stripe-quote-payment-link-custom-field"
- Validation & Defaulting > Formula: checked.
- Applies To:
Sale
- Save. Generated ID:
custbody_stripe_quote_payment_link
Here's the default formula that needs to be specified on the field:
'https://app.suitesync.io/customers/test/acct_/' ||
{entity.id} || '/' ||
(to_number(TO_DATE({entity.datecreated}, 'yyyy-mm-dd hh24:mi:ss') - to_date('01-JAN-1970','DD-MON-YYYY')) * 86400) ||
'?amount='||
(to_number({total}) * 100) ||
'&memo='||{tranid}
Here's the formula to use when you have multiple subsidiaries/stripe accounts:
'https://app.suitesync.io/customers/test/' ||
{subsidiary.custrecord_stripe_account_id} || '/' ||
{entity.id} || '/' ||
(to_number(TO_DATE({entity.datecreated}, 'yyyy-mm-dd hh24:mi:ss') - to_date('01-JAN-1970','DD-MON-YYYY')) * 86400) ||
'?amount='||
(to_number({total}) * 100) ||
'&memo='||{tranid}
Here are some details to keep in mind:
- The
acct_value is unique to your account. This is your Stripe account ID. - The
{id}is theinternalIDof the NetSuite invoice - Since the URL structure is just made up of the Stripe Account and the internal ID, you can generate this link on your own if needed.
- Note that if you are using a multi-subsidiary (with corresponding unique Stripe accounts for each entity) you'll need to use
{subsidiary.custrecord_stripe_account_id}instead of youracct_value.
Auto-applying payments made through a estimate or quote to a future NetSuite Invoice
After a payment is made, by default it won't be auto-applied to a future NetSuite invoice that generated by the quote. However, we've built a script that you can install in your NetSuite account to auto-apply any partial or fully unapplied payments to a open invoice when the invoice is created.
Viewing the Deposit Associated with a Payment or Refund
NetSuite does not provide a way to determine which bank deposit a given transaction is associated with. In other words, there's no way to figure out which batch payment a payment or refund is associated with by looking at the transaction in NetSuite. We've fixed this limitation by adding a custom field. This field is in no way required by SuiteSync, but it is a helpful tool for your finance team.
The instructions below show how you can add a custom field that exposes the transaction ID of the deposit record a transaction is associated with.
When a deposit is not associated with a record this field will display an error. Since the field is not a formula field you can safely ignore the error. It won't affect any scripts or other functionality in NetSuite.
You can install this field using the bundle "SuiteSync Transaction Deposit ID" ID 171428.
- Customization > Lists, Records & Fields > Transaction Body Fields > New
- Label: "Deposit ID"
- ID:
_bank_deposit_id - Description: "The transaction ID of the bank deposit record that deposited the charge or refund."
- Type: Free-Form Text
- Store Value checkbox > Unchecked.
- Applies To: Customer Payment
- Display > Display Type:
Disabled - Validation & Defaulting:
- Formula: checked
- Default value:
{deposittransaction.number}
- Subtab: Main
Saved Search for Disputes
Here's a saved search you can use to identify all of the CreditMemos and CustomerRefunds representing disputes in your account:
- Title: "Stripe Disputed Charges"
- ID:
_stripe_disputes - Criteria:
- Type: Customer Refund, Credit Memo
- Memo: contains
Stripe: dp_(you could also search on the external ID) - Main Line: true
Alternatively, you can install the "Stripe Billing & Refund Errors" ID 170427 to install this search.
Saved Search for Refund Errors
Here's a saved search you can build to watch for any refund errors:
- Type: Customer Refund, Credit Memo
- Memo: contains "Stripe Refund Error"
- Main Line: true
Here's a screenshot of how the saved search should look:

B2B Payments
In order to support B2B Payments, the feature that enables the "Stripe Invoice Payment Link" on your NetSuite Invoice, two changes need to be made to your NetSuite instance:
- Add the "Stripe Invoice Payment Link" custom field to sale transactions. You can install this field using bundle ID
170321 - Add the "Amount Remaining" field needs to be added to the form used for invoices on your account
- In most cases, you'll also want to add the "Stripe Transaction ID" field. You can install this field using bundle ID
170177
Creating the "Stripe Invoice Payment Link" custom field
- Customization > Lists, Records, and Fields > Transaction Body Fields > New
- Configure field:
- Label:
Stripe Invoice Payment Link - ID:
_stripe_invoice_payment_link - Type:
Hyperlink- You may want to change the type to free-form text if you are primarily using this form in templates (emails, pdfs, workflows, etc)
- Display > Subtab:
Main - Display > Display Type:
Disabled - Store value:
false/ unchecked - Description: link to a SuiteSync-hosted payment form which allows customers to pay SalesOrders and Invoices with your Stripe account.
- Validation & Defaulting > Default Value:
https://app.suitesync.io/payments/test/acct_/{type}/{id}- The
acct_value is unique to your account. This is your Stripe account ID. - The
{id}is theinternalIDof the NetSuite invoice - Since the URL structure is just made up of the Stripe Account and the internal ID, you can generate this link on your own if needed.
- If you only want to support payments on invoices, remove the
{type}URL component
- The
- Validation & Defaulting > Formula: unchecked.
- After save, make sure this value is still unchecked. NetSuite resets this field value for you without warning.
- Applies To:
Sale
- Label:
- Save. Generated ID:
custbody_stripe_invoice_payment_link
You may want to configure the link to disallow credit card payments for invoices above a certain value. You can do this by using the following formula in the "Default Value" (make sure you click the "Formula" checkbox):
CASE
WHEN NVL2({amountremaining},{amountremaining},{total})>100.0 THEN
  'https://app.suitesync.io/payments/test/acct_/'||{type}||'/'||{id}||'?card=false'
ELSE
  'https://app.suitesync.io/payments/test/acct_/'||{type}||'/'||{id}
END
A quick note about the formula above:
-
NVL2is a Oracle DB function which chooses{amountremaining}if it exists on the invoice but if it doesn't the{total}value is used. - The
{amountremaining}is not available by default on the invoice form. You need to make sure this is shown on your invoice form otherwise the total and not the amount due is used to determine if the credit card option should be shown.
Here's more information on all of the customization options available.
Adding Payment Link to Invoice PDFs
You can add the invoice payment form to either the "standard" NetSuite PDFs or the advanced PDFs.
The ability to customize the "standard" invoice PDFs is limited:
- You cannot use HTML: links and advanced formatting cannot be used.
- You cannot conditionally display content. For example, you cannot hide the payment link depending on the invoice total (or any other attribute of the invoice or customer).
- Custom field types do not affect formatting. For instance, a Hyperlink field type is not rendered with the "Link Text". In the case of the payment form link, the full URL is rendered instead of a user-friendly "Pay Online" link.
To add the link to the standard PDFs, just include {custbody_stripe_invoice_payment_link} in a text box.
Most likely, you'll want to control the text, formatting, etc of the invoice link in your PDF. You can use the "Advanced PDF/HTML Templates" for this.
If you'd like to customize when the payment link appears on your Invoice PDF there are two options:
- Customize the template using the NetSuite PDF template language (FreeMarker)
- Use SuiteScript to remove or customize custom fields and then include that field in your template
Customizing the template is usually the easiest way to go. Here's a quick start guide:
- Ensure that "Printing Type: Advanced" is enabled on your preferred invoice form
- Navigate to Customization > Forms > Advanced PDF/HTML Templates and customize the preferred Invoice template.
- If you'd like to include the invoice payment link as-is, add
${record.custbody_stripe_invoice_payment_link}to your template. You can customize the link text by editing the transaction body field. SuiteSync does not depend on any specific setting of thecustbody_stripe_invoice_payment_linktransaction body field aside from the default value, so you are free to edit any other aspect of the field. - If you'd like to customize the link text, or other aspects of the link, switch the "Stripe Invoice Payment Link" transaction body field to be a "Free-form text" field and create the link HTML directly in the template. For example
<a href="${record.custbody_stripe_invoice_payment_link}">Custom Link Text</a> - If you want to conditionally add the invoice link to your template you can edit the template as HTML code and implement more advanced customizations. For instance, if you want to only show the invoice when the total of the invoice is greater than $100 and less than $2,000 you could use the following snipped:
<#if record.total gt 100 && record.total lt 2000>
<a href="${record.custbody_stripe_invoice_payment_link}">Pay Online</a>
</#if>
You can also use template logic to customize which payment methods are available (or any of the other customization options):
<#if record.total gt 100 && record.total lt 2000>
<a href="${record.custbody_stripe_invoice_payment_link}?card=false">Pay Online</a>
</#if>
Customizing advanced PDF templates is confusing. Here are some tips and helpful resources:
- Both
amountremainingandamountremainingtotalboxdo not seem to exist on therecord - If you encounter "Error: Outer tag is" you may have pressed "Enter" in a field that has strict formatting requirements
-
recordcontains all of the information about the invoice -
companyInformationcontains a reference to the company record. This is the data in your "Company Information" setup area. Hint: company information is actually stored as a single subsidiary record on your account. - Hyperlink fields include the
<a>tag, not just the link target. If you want to customize the link text you need to convert the hyperlink field - FreeMarker Reference. This is the language NetSuite uses for templating.
- Tutorial demonstrating some advanced usage
- Tutorial demonstrating FreeMarker usage
Customizing The Email Address Used on the Payment Page
By default, the email address associated with the customer (entity) of the transaction is used on the payment page. Instead of using this email, you can force the user to enter in an email to be used by adding ?email=false to the payment page url.
Adding "Amount Remaining" to the NetSuite Invoice form
The "Amount Remaining" field (sometimes called "Amount Due") needs to exist on your invoice form in order for the payment form to work. If this field is not specified, you'll get a error message when you view a payment link.
- Navigate to "Customization > Forms > Transaction Forms"
- View the preferred transaction form for Invoices. Or, if you are using another custom form for your invoices, use that form. View transaction forms
- Screen Fields > Amount Remaining. The name of this field is often "Amount Due"
- Save
Here's a screenshot of the field you are looking for:
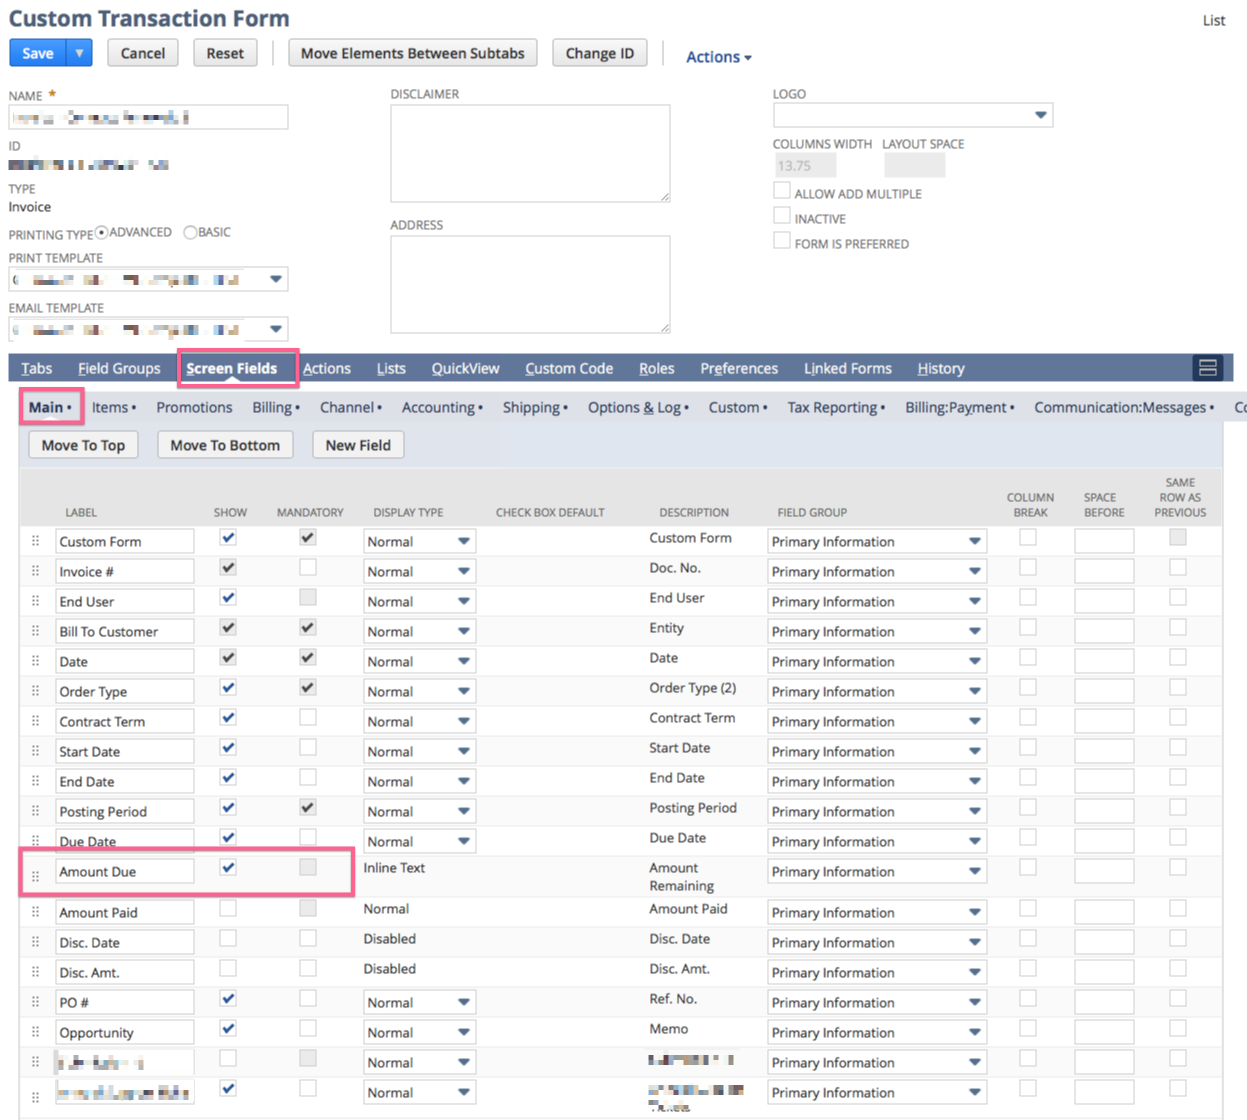
You may have multiple invoice custom forms that you use in NetSuite. If this is the case, you'll need to make sure that this field is enabled on all forms used.
Per-subsidiary Stripe Accounts
In some cases, you may have a unique account for each subsidiary. In this case you'll want to tie the Stripe account ID to the subsidiary using a custom field on the Subsidiary.
You can install this field using the bundle "SuiteSync Subsidiary Account ID" with ID 218349.
Here's how to setup the field:
- Customization > Lists, Records, and Fields > Other Custom Field > New
- Configure field:
- Record Type: Subsidiary
- Label: Stripe Account ID
- ID:
_stripe_account_id - Type: Free-form text
- Store Value: true
- Description: "Field to store the Stripe Account ID for this subsidiary. It normally starts with "acct_"."
- Save. Generated ID:
custrecord_stripe_account_id - Enter in the Stripe Account IDs for your subsidiaries.
- Change the default value on the "Stripe Invoice Link" field:
https://app.suitesync.io/payments/test/{subsidiary.custrecord_stripe_account_id}/{id}- Note that the formula checkbox should be unchecked.
Here's a screenshot of what the transaction body field should look like:

The subsidiary-specific links work for some users, but not others
If you see %7Bsubsidiary.custrecord_stripe_account_id%7D in the URL of the resulting payment link for some users, it means that the role for those users doesn't have read-only access to the subsidiary list. Since the Stripe account is associated with the subsidiary, each role that needs to send payment links out needs to have access to the subsidiary list.
You can fix this by editing the employee's role and adding 'Lists > Subsidiary: View' to their permissions.
Customized Stripe Account Mapping
It's also possible to choose which Stripe account should be used for payment based on custom logic on your end. For instance:
- You want to use different Stripe accounts depending on which currency the transaction is in
- Depending on the customer, you may want to use a different Stripe account
Here's how this is done:
- A field is added to the transaction record which contains the Stripe Account ID that should be used for the transaction
- A
afterSubmitNetSuite script is setup in your account which sets this custom field to the Stripe account ID that should be used. SuiteSync will not set up or configure this script. However, we have an open-source script which your NetSuite admin or consultant can quickly customize in order to complete this part of the process.
Here's how to create the customized field in your NetSuite account:
- Customization > Transaction Body Fields > New
- Create a new field to appear on SalesOrders and Invoices.
- Label: "Stripe Account ID"
- Description: "Field to contain the Stripe account ID to use for this transaction"
- ID:
_stripe_account_id - Type: free form text
- Store Value: true
- Applies to: Sale
- Save. Generated ID:
custbody_stripe_account_id
Here's an example script which sets the "Stripe Account ID" field to a Stripe Account ID value (acct_) based on the currency of the transaction:
https://gist.github.com/iloveitaly/aced3081f924651891a44c474625976d
After these two pieces are in place you can customize your payment link to pull the Stripe Account ID from the transaction and not the subsidiary. In the Stripe Payment Link field use the following default value:
https://app.suitesync.io/payments/test/{custbody_stripe_account_id}/{type}/{id}
Sending Payment Reminder (Dunning) Emails
NetSuite workflows (or SuiteScripts) can be used to send customers automated emails throughout the collection process.
Here's an example of how to create a workflow to send an email to customers if their saved card failed to charge, or if they don't have a saved card or bank, one day after the invoice was due:
- Search for the "Stripe Billing Errors" saved search. It's easiest to plug
page: Stripeinto the global search. - Edit the search
- Add a "Due Date/Receive By" filter. Don't set the value to be a specific day, but use a built-in day filter. For instance, if you want to send a payment reminder the day after a payment is due set the value to yesterday.
-
Create a new workflow.
- Record Type: Transaction
- Sub Types: Invoice
- Initiation: Scheduled
- Saved Search Filter: Choose the search you just created
- Frequency: Daily
- Click on "State 1"
- In the bottom left, click on "New Action" then choose "Send Email"
- Recipient: From Field > Current Record > Email
- Use
${transaction.custbody_stripe_invoice_payment_link}to include the payment link
Including the Stripe payment link in contexts where a read-only field won't work
If you are using a NetSuite function which does not allow you to access a read-only field you can use the following script to generate the Stripe payment link dynamically.
var STRIPE_ACCOUNT_ID = "acct_";
var BASE_URL = "https://app.suitesync.io/payments/" + STRIPE_ACCOUNT_ID + "/";

function generateStripePaymentLink(nsRecord) {
  return BASE_URL + nsRecord.getRecordType() + "/" + nsRecord.getId();
}

if (nlapiGetContext().getExecutionContext() == "debugger") {
  generateStripePaymentLink(nlapiLoadRecord("invoice", 14056546));
}
Note that this script will not work in a multi-subsidiary setup. Contact support for help customizing this script.
Creating a Sales Order Link to Accept a Partial Deposit for an Order
You may want to create a unique link to send to customers to enable them to submit a partial deposit on a sales order.
You can do this by specifying the amount parameter on the sales order payment link using a formula field.
Here's how to do this:
- Label:
Partial Deposit Link - ID:
_stripe_partial_deposit_link - Type:
Hyperlink- You may want to change the type to free-form text if you are primarily using this form in templates (emails, pdfs, workflows, etc)
- Display > Subtab:
Main - Display > Display Type:
Disabled - Store value:
false/ unchecked - Description: "Allow customers to submit a partial deposit on a sales order. Learn more: "
- Validation & Defaulting > Formula: checked.
- Applies To:
Sale
- Save. Generated ID:
custbody_stripe_partial_deposit_link
Here's the default formula that needs to be specified on the field:
'https://app.suitesync.io/payments/test/acct_/' ||
{type}||'/'||{id}||
'?amount='||
(to_number({total}) * 100)
Here's the link when subsidiary-specific accounts are in place:
'https://app.suitesync.io/payments/test/' ||
{subsidiary.custrecord_stripe_account_id} || '/' ||
{type}||'/'||{id}||
'?amount='||
round(to_number({total}) * 100 * 0.50)
Here's an example of what the link looks like when it's fully generated:
https://app.suitesync.io/payments/test/acct_xyz/invoice/123?amount=10000
Customer Accounts
Adding "Stripe Customer Account Link" to NetSuite
This field is a custom entity field which creates a link on the customer record to a page where customers can make a payment on their account for an amount they specify.
This field can be installed using bundle ID 195309.
Here are the detailed instructions on how to setup this field:
- Customization > Lists, Records, and Fields > Entity Fields > New
- Configure field:
- Label:
Stripe Customer Account Link - ID:
_stripe_customer_account_link - Type:
Hyperlink- You may want to change the type to free-form text if you are primarily using this form in templates (emails, pdfs, workflows, etc)
- Display > Subtab:
Main - Display > Display Type:
Disabled - Store value:
false/ unchecked - Description:
Link to a SuiteSync-hosted payment form which allows customers make payments on their account using card or bank transfer. - Validation & Defaulting > Default Value:
'https://app.suitesync.io/customers/test/acct_/'||{id}||'/'||(to_number(({datecreated}- to_date('01-JAN-1970','DD-MON-YYYY')) * (86400)))- Ensure the "Formula" box is checked.
- The
acct_value is unique to your account. This is your Stripe account ID. - The
{id}is theinternalIDof the NetSuite invoice - If you have a multi-subsidiary configuration you'll want to use this formula
'https://app.suitesync.io/customers/test/'||{subsidiary.custrecord_stripe_account_id}||'/'||{id}||'/'||(to_number(({datecreated}- to_date('01-JAN-1970','DD-MON-YYYY')) * (86400))) - If you are configuring the customer portal for production remove the
test/in the URL.
- Validation & Defaulting > Formula: checked.
- Applies To:
Customer
- Save. Generated ID:
custentity_stripe_invoice_payment_link
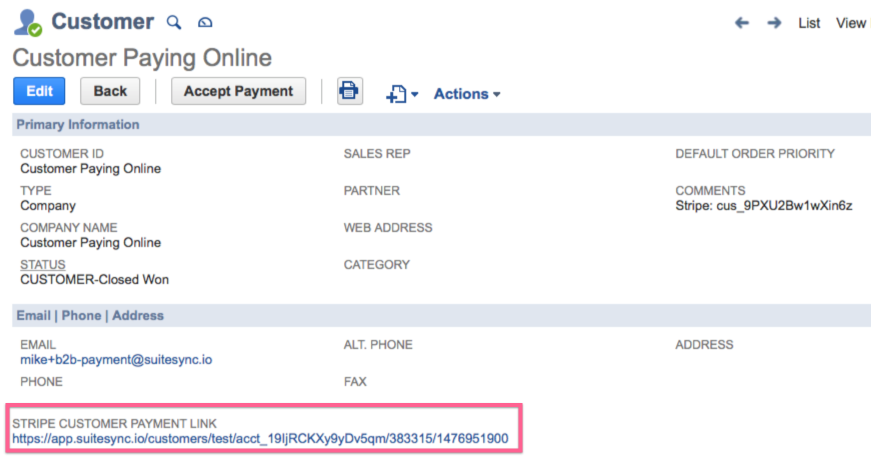
Once this setup in complete, you should see a field on your NetSuite customers that looks something like this:
Here's a formula you can use if you'd like to default to the account management page:
'https://app.suitesync.io/customers/test/acct_/' ||
{id} ||
'/' ||
(to_number(({datecreated}- to_date('01-JAN-1970','DD-MON-YYYY')) * (86400))) ||
'#account'
eCommerce
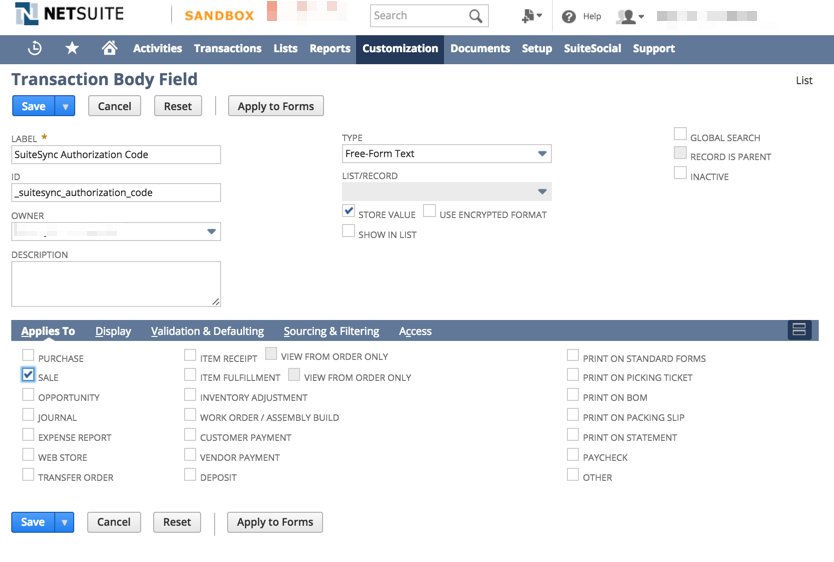
Creating the SuiteSync "Authorization Code" Field
This field is also called the "Stripe Transaction ID" field.
This custom field is more specifically a "custom NetSuite transaction body field". You can install it using bundle ID 170177 or create it using these instructions:
- Customization > Transaction Body Fields > New
- Create a new field to appear on SalesOrders and Invoices.
- Label: "SuiteSync Authorization Code" (or "Stripe Transaction ID")
- Description: "Field where Stripe charge or refund IDs should be entered"
- ID:
_suitesync_authorization_code - Type: free form text
- Store Value: true
- Applies to: Sale
- Global Search: true. This enables you to search for transactions by the Stripe Charge ID.
- Save. Generated ID:
custbody_suitesync_authorization_code
Enabling Invoicing (Billing) before Order Fulfillment
Enabling this NetSuite feature will enable you to create Invoices before completely fulfilling a SalesOrder. You'll find the toggle for this feature here:
Setup > Accounting > Accounting Preferences > Invoicing > Invoice in Advance of Fulfillment
Once this feature is enabled, a bill button will appear on the order immediately after it's created. Read more about this feature in the NetSuite documentation.
Configuring SalesOrders to Create Invoices, and not CashSales
SuiteSync requires that Invoices are used instead of CashSales. Here's why.
In order for SuiteSync to work properly on your account, you need to make sure that invoices are created when the sales order in NetSuite is billed. Whether or not an invoice is created is determined by a combination of the custom form that is used on the sales order, and the payment method that is selected on the sales order.
Here's how to ensure a invoice is created when a sales order is billed:
-
Use a custom form which "inherits" from the
Sales Order - Invoiceform in NetSuite.- The form used on a SalesOrder determines if a Invoice or CashSale record is created when the order is billed.
- Here’s where the form is set on the sales order: https://cl.ly/1Q021I1r3C0E.
- If you are using a SalesOrder form that creates a CashSale, you’ll need to use a different form that creates invoices when a SalesOrder is billed.
- Here’s the form you’ll want to customize in order to create an invoice instead of a cash sale: https://cl.ly/290S1f3x1R29. You can customize forms here.
- Here’s how you can tell if a custom form will generate an invoice or a cash sale: https://cl.ly/0x243M382S2T
-
Set the payment method to "blank" on the sales order. Here’s what the sales order should look like: https://cl.ly/021F2i2T113y
If this is done correctly, you should see a "Create Deposit" button on the Sales Order. Here’s an example of what you'll see: https://cl.ly/20422u030S0K
Note that in some NetSuite accounts the sales order needs to be approved in order to allow a customer deposit to be created.
Multiple Shipping Stages
This feature doesn't interface with or affect the eCommerce integration, but there is a feature that's hard to find that enables Item Fulfillments (shipments) to have multiple states. This is super helpful for integrating Item Fulfillments with a 3PL service: you can create a item fulfillment in the "picked" status and then move it to "shipped" when the 3PL has notified you when the package has shipped.
Here's where you can enable this feature:
Setup > Setup Tasks > Enable Features > Transactions > Shipping & Receiving > Advanced Shipping
SalesOrders that have been approved cannot be cancelled
From the NetSuite documentation:
By design, only Sales Order with 'Pending Approval' status can be Cancelled.
Credit Memo Without Refund
If you have refunds from NetSuite enabled, a refund is issued in Stripe when a Credit Memo is created (only if the invoice was paid with a Stripe payment).
This is triggered by the presence of a Stripe payment ID on the Credit Memo. If you want to prevent a refund from being issued, you just need to hide/remove the Stripe payment ID from the CreditMemo. Payment IDs start with either a ch_ or py_ prefix.
One way to do this is to remove the "Stripe Transaction ID" field (custbody_suitesync_authorization_code) from the default form and setup a new custom form to use when triggering refunds:
- Find the default preferred form
- Find "Stripe Transaction ID" field and hide it. Normally under the custom field screen fields list.
- Change form name to "CreditMemo with Refund" or something along those lines
- Save as
Adding "Unapplied" to the NetSuite Credit Memo form
The "Unapplied" field needs to exist on your credit memo form in order for the requested refund amount to be calculated. If this field is not specified, refunds will not be issued.
- Navigate to "Customization > Forms > Transaction Forms"
- View the preferred transaction form for credit memos. Or, if you are using another custom form for credit memos, use that form. View transaction forms
- Screen Fields > Items > Unapplied. Make sure "show" is checked.
- Save
Here's a screenshot of the field you are looking for:
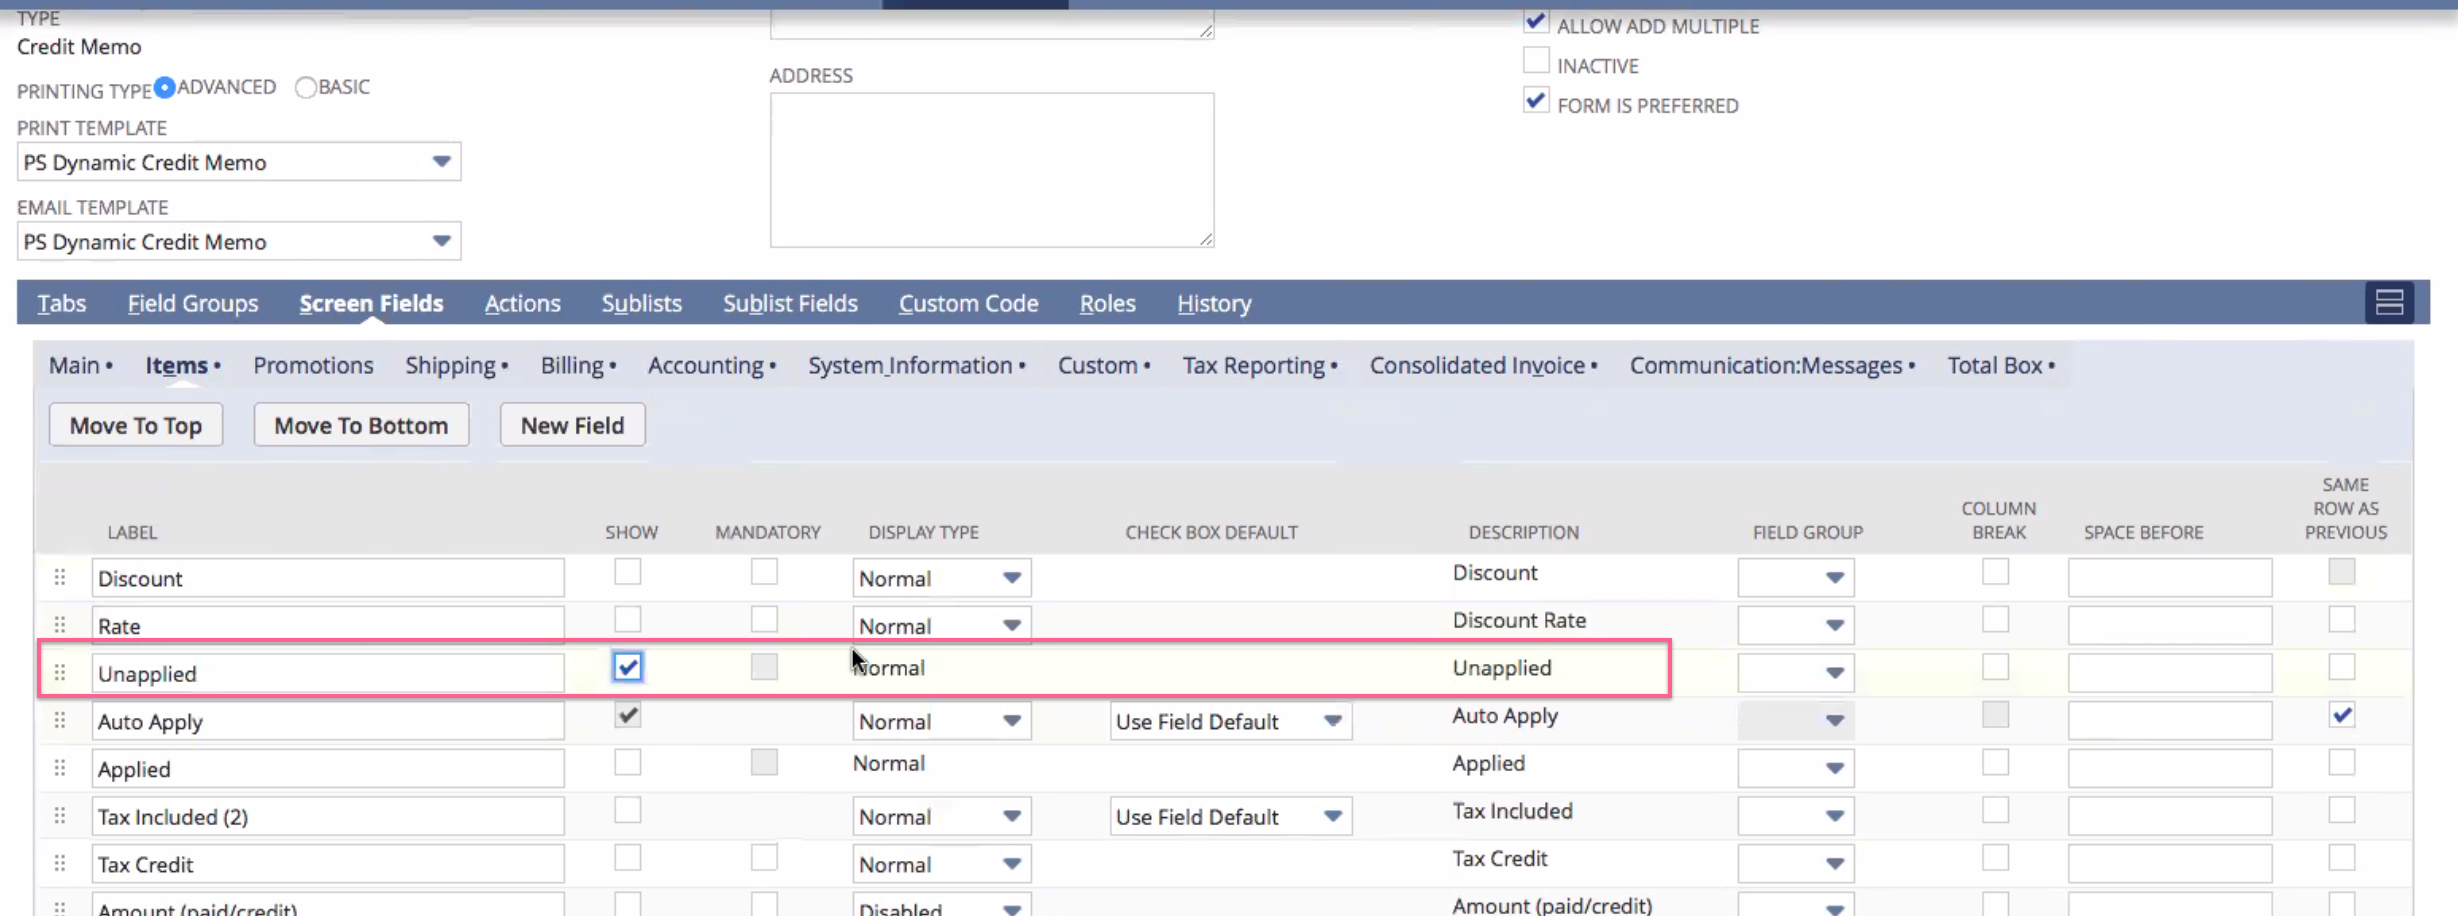
You may have multiple credit memo custom forms that you use in NetSuite. If this is the case, you'll need to make sure that this field is enabled on all forms used.
Embedded Payments (Payments inside NetSuite)
Our embedded payments form enables you to pay NetSuite transactions with Stripe securely in any of your systems. This is most commonly used to enable sales reps to use Stripe to process phone orders within the NetSuite interface, but this form can be used for many other purposes as well.
Available Features and Options
There are options available which change how the payment form operates in NetSuite. These options can be set separately for payments on invoices and payments through the script deployments for each of those records.
Here's how to find the script deployments:
- Do a global search for
page: Scripts - Search the page for
SuiteSync Stripe Payment Processingand click view on the resulting script - Go to the "Deployments" tab. You will see two deployments: Invoice & SalesOrder.
These options are available as parameters on each of the script deployments.
- "Stripe Account ID". This should be the ID of your Stripe account (normally starts with
acct_). - "Capture Charge" (
_txn_capture_charge). Allows the user the option to capture, or authorize, a payment. If you always want to capture payments, remove this script parameter. If you'd like to default the form to capture payments set this field totrue. - "Store Credentials" (
_txn_store_credentials). Allows the user the option to store payment credentials for future use. Delete this script parameter if you do not want to allow customers the option to store cards. Set this script parameter totrueif you'd the form to store cards by default, and set the script parameter tofalseif you'd like to default the form to not store credentials. - "Saved Cards" (
_txn_saved_cards). Allows the user to charge saved cards associated with a customer. - "Embed Key". This is a security token used by the integration. Contact support for this token.
- "Tab ID". This is the name of the tab that you want the payment page to be added to. Right click on the tab and inspect the element. This should show you a bunch of code containing something like
ShowTab('custom123'). Use thecustom123as the "Tab Name".
There are also some undocumented options available to change options such as which Stripe account is used, what statement descriptor is used, etc. Contact support about your use-case for more information.
Limiting Access to Payment Processing in NetSuite
You can limit who has the ability to run payments through Stripe by changing the permissions associated with the script deployments.
Fraud (Radar)
Fraud Message Field
- Customization > Transaction Body Fields > New
- Create new field to appear on CashSale, SalesOrders, and Invoices.
- Label: "Stripe Fraud Message"
- ID:
_suitesync_fraud_message - Description: "A field to store feedback from Stripe's fraud system. If a CashSale, SalesOrder, or Invoice is associated with a possibly fraudulent charge, this field will have content."
- Type: Free-form Text
- Store Value: true
- Applies To: Sale
- Subtab: Main
Fraud Processed Field
- Customization > Transaction Body Fields > New
- Create new field to appear on CashSale, SalesOrders, and Invoices.
- Label: "Stripe Fraud Processed"
- ID:
_suitesync_fraud_processed - Description: "A checkbox which indicates if the transaction has been checked for fraud by Stripe's system."
- Type: Checkbox
- Store Value: true
- Applies To: Sale
- Subtab: Main
Revenue Recognition
You can learn more about how revenue recognition works through this guide.
Old (pre-2017) Revenue Recognition
Creating a Deferred Revenue Account
A deferred revenue account is a special account type in NetSuite. Here's how to create the account:
- Visit Setup > Accounting > Chart of Accounts
- Create a new account unless the user specifies they want to use an existing account.
- Type: Deferred Revenue
- If subsidiaries are enabled, ensure that a parent subsidiary is picked with "Include Children" is enabled.
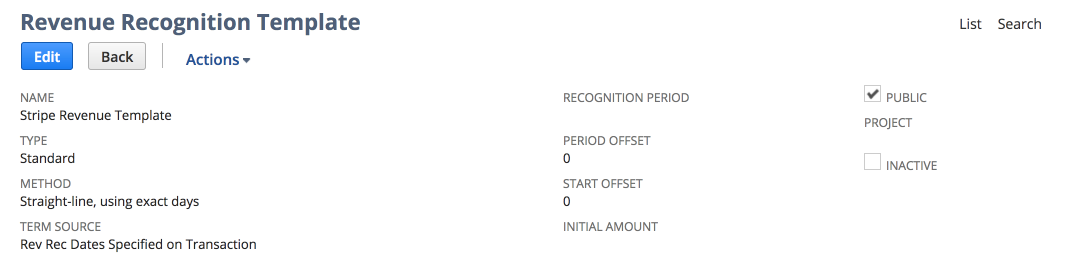
Creating a Revenue Recognition Template
- Visit "Revenue Recognition Templates"
- Create a new revenue recognition template
- Name: Stripe Revenue Template
- Type: Standard
- Method: Straight-line, by even periods
- "Straight-line, by exact days" can be used as well. Ask your accounting department what would be best.
- Do not change the method of an existing rev rec template, create a new template instead.
- Term source: Rev Rec Dates Specified on Transaction
- Period offset: 0
- Start offset: 0
- Recognition Period: blank. The start and end dates specified on the invoice is used in place of the recognition period.
Here's an example of what the rev rec template should look like:
Advanced Revenue Recognition
This is the guide to setting up rev rec from a system admin perspective. If you are interested in the details of how Stripe ties into NetSuite's rev rec engine from a finance perspective, check out this guide.
- Create a rev rec rule
- Create an item and associate it with a rev rec rule
- Create transaction column fields to store subscription start and end dates from Stripe
- Create a rev rec mapping to source the rev arrangement start and end date from the custom column field level
- Set a preferred rev rec arrangement form
Creating a Rev Rec Rule
-
Create new "Revenue Recognition Rule"
- Name: Stripe Rev Rec Rule
- Recognition Method: Ask your finance team.
- Rev Rec Start Date Source: Arrangement Transaction Date
- Rev Rec End Date Source: Arrangement Transaction Date
- Term in Months: 0. Term will be driven from the invoice.
- Save. Make sure you set any Stripe items to this rev rec form.
Setup Revenue Field Mapping
- Search for "Revenue Field Mapping" in the global search
- You'll need to create mappings for the start & end date on the line item level. This will instruct the rev rec engine to pull the start & end dates from the dates pulled from Stripe.
Start date:
- Source Record Type: Transaction Line
- Source Field: SuiteSync Rev Rec Start Date
- Target Field: Forecast Start Date
End date:
- Source Record Type: Transaction Line
- Source Field: SuiteSync Rev Rec End Date
- Target Field: Forecast End Date
Refreshing Plans
When you are testing rev rec in the NetSuite sandbox the rev arrangements are not generated in real time after the invoice is created.
However, you can "force" the rev arrangements to be created by going to the "More
Update Revenue Arrangements and Revenue Plans" and clicking:
- Refresh
- Update Revenue Arrangements
- Update Revenue Plans
Create Rev Rec Start Date Custom Transaction Column Field
Note that this field is normally installed automatically using a bundle.
- Label: SuiteSync Rev Rec Start Date
- ID:
_suitesync_rev_rec_start - Description: The start date for the revenue recognition schedule of Stripe subscription line items
- Type: Date
- Store Value: Check
- Applies To: Sales Item
- Save. Finalized ID:
custcol_suitesync_rev_rec_start
Create Rev Rec End Date Custom Transaction Column Field
- Customization > Lists, Records & Fields > Transaction Column Fields > New
- Create new field
- Label: SuiteSync Rev Rec End Date
- ID:
_suitesync_rev_rec_end - Description: The end date for the revenue recognition schedule of Stripe subscription line items
- Type: Date
- Store Value: Check
- Applies To: Sales Item
- Save. Finalized ID:
custcol_suitesync_rev_rec_end
Setting a Preferred Rev Rec Arrangement Form
By default, there's not a preferred rev rec arrangement form configured. This triggers the following error when attempting to view a rev rec arrangement:
"No appropriate forms are enabled for this role. Please contact your Administrator"
To fix this issue:
- Visit the custom transactions form page
- Find the "Revenue Arrangement" row
- Ensure the "Preferred" checkbox is selected
- Press save
Stripe Application Configuration
CVent
- CVent sets three metadata fields: Comment1, Comment2, and (you guessed it!) Comment3. The charge description does not contain any of this data.
- CVent does not pass over the event date into Stripe in any way. This means we cannot indicate a revenue recognition in NetSuite because the data does not exist in Stripe.
-
Comment1is the event ID. It's recommended to create a custom field in NetSuite to store this information on the invoice:- Name: "CVent Event ID"
- ID:
_cvent_event_identifier - Free-form text, store value, only needs to be available on "Sale".
-
Comment2is the name of the ticket purchaser. - One-time tokens are used. There are no customer records in Stripe.
- There is no application fee charged by CVent in Stripe
- When this inspection was done CVent was using Stripe API version
2017/02/14with bindingsStripe/v1 .NetBindings/7.2.0
Recognizing Revenue Based on the Event Date
You may want to only recognize revenue for events after the event date has passed. Since CVent does not pass over the event start to Stripe, there is not a way to automatically set the event in NetSuite (please contact CVent and request this feature!).
Here are two workarounds to recognize revenue when the event date has passed:
- Use a manual journal entry.
- Setup the SuiteSync item for events to post to a deferred revenue account.
- When the event passes, manually create a journal entry to recognize revenue based on a CVent export.
- Use a manual mass-update based on the event ID. Here's how:
- Setup the SuiteSync item for events to post to a deferred revenue account. Set this item up to recognize revenue based on the start date of the invoice. The start date will not be set by the integration, but instead set manually by the mass-update in step #3.
- Create a field on the NetSuite invoice to store the CVent Event ID passed into Stripe via the
Comment1metadata field. - Run a manual mass-update CSV import which would set a rev rec start date on the invoice based on the Event ID in the field that you created.
Teachable
- Charge description is the name of the course/lesson that was purchased
- An application fee is charged
- One-time tokens are used. There are no customer records in Stripe.
- Additional information is passed in the metadata:
-
emailcustomer email. -
product_namematches thedescription -
product_refthis is the best option for mapping. It's recommended to create a custom field in NetSuite to store this information on the invoice:- Name: "Teachable Product Reference"
- ID:
_teachable_product_ref - Free-form text, store value, only needs to be available on "Sale".
provider_refusername
-
- When this inspection was done, Teachable was using Stripe API version
2014-11-05with bindingsGuzzle/3.9.3 curl/7.19.7 PHP/5.6.31
Saved Search for Duplicate Payments
This saved search can be used to select payments that could not be applied to an invoice because it was already paid in full. This search can be installed using bundle ID 170427 ("Stripe Billing & Refund Errors").
- Title: "Stripe Duplicate Invoice Payments"
- ID:
_stripe_duplicate_payments - Criteria
- Type: is Payment
- Memo: contains
Stripe Payment Error: could not apply to invoice - Status: Open
- Main Line: is true
Automatic Billing
Saved Search for Failures
Here's a saved search you can create to select any invoices which encountered an error during the automatic billing process. This search can be installed using bundle ID 170427 ("Stripe Billing & Refund Errors").
- Title: "Stripe Billing Failures"
- ID:
_stripe_billing_failures - Criteria:
- Type: Invoice
- Main Line: true
- Status: Open
- Memo: contains "Stripe". This is an indicator that we've passed back information about why the charge failed. If you are looking to just identify which invoices need to be rescheduled for billing just keep it simple omit this criteria.
Saved Search for Asynchronous (ACH) Failure Refunds
If an asynchronous payment fails, a refund is created.. If this occurs a customer refund is created and the reason for the failure is indicated on the refund.
This search can be installed using bundle ID 170427 ("Stripe Billing & Refund Errors"). You can also create a saved search in NetSuite to identify these ACH payment failures.
- Title: "Stripe Async Failures"
- ID:
_stripe_async_failures - Criteria:
- Type: is Customer Refund
- Main Line: true
- Memo: contains "Stripe Payment Failure"
- Public: checked
Using NetSuite With Stripe Sigma
Identify Stripe refunds without a corresponding NetSuite refund:
select refunds.id, charges.id, substr(charges.description, 21) as recurlyPaymentId, refunds.created
from refunds
left outer join refunds_metadata
	ON refunds_metadata.refund_id = refunds.id AND refunds_metadata.key = 'netsuite_customer_refund_id'
inner join charges
	ON charges.id = refunds.charge_id
where
  refunds.created > date('2018-01-01') AND
  charges.captured AND
  charges.status = 'succeeded' AND
  refunds_metadata.key IS NULL
order by refunds.created
Identify Stripe charges without an associated customer payment. Note that if you use CashSales or CustomerDeposits this needs to be modified.
select charges.id, substr(charges.description, 21) as recurlyTransaction, charges.created
from charges
left outer join charges_metadata
	ON charges_metadata.charge_id = charges.id AND charges_metadata.key = 'netsuite_customer_payment_id'
where
  created > date('2018-01-01') AND
  charges.status = 'succeeded' AND
  charges.captured AND
  charges_metadata.key IS NULL
--order by charges_metadata.charge_id
order by created