Customers
In most workflows, creating a Stripe customer creates a corresponding NetSuite customer.
Here's how it works:
- By default, customers are always created as company customers. This can be customized on a global or per-record basis.
- The Stripe-generated customer ID (
cus_123) is used as the entity ID. -
descriptionif specified, is used as the NetSuite company name. Otherwise, the Stripe ID is used as the company name. - Phone, email, and address is also translated over if specified on the Stripe customer.
- If provided, the billing & shipping addresses is pulled into NetSuite
- Any additional standard or custom fields can be specified using metadata
- There's a duplicate detection system that can help link Stripe customers to pre-existing NetSuite customers.
Using Existing Customers
If there's a common identifier shared between Stripe customers and NetSuite customers, such as an email or account ID, we can use that data to link a Stripe customer to a NetSuite customer in order to eliminate duplicates.
You can link existing NetSuite customer records with Stripe customers by specifying the NetSuite customer's internalId in the Stripe customer metadata.
Here's an example:
Stripe::Customer.create(
  email: "existing-netsuite@example.com",
  metadata: {
    netsuite_customer_id: 123
  }
)
Customer Information Pulled from Stripe
Here's a list of the fields that are pulled by default from Stripe to NetSuite. Additional fields can be mapped using Stripe metadata, or default values for NetSuite fields can be specified.
| Stripe Field | NetSuite Field |
|---|---|
| Stripe ID | Entity ID & external ID |
| Description | Company Name (or first and last name) |
| Phone | Phone |
| Shipping Address | Default Shipping Address |
| Billing Address | Default Billing Address |
Note that NetSuite requires that the name of a customer is set. If no name is provided through the Stripe customer description field or using custom metadata fields, the integration uses the email address on the customer. If no email address is specified in Stripe, the Stripe customer ID is used.
Entity ID and Customer Name
In NetSuite, there are two key fields that name a customer. One is the customer name, which is either the "Company Name" field in the case of a company customer or the "First Name" and "Last Name" fields in the case of a individual. There's also the "Entity ID" field in NetSuite which is similar to a customer number or customer ID.
By default, the Stripe Customer ID (start with a cus_) is used for the entity ID in NetSuite. The reason for this is NetSuite requires that the Entity ID is unique across all NetSuite customer records and using a name or company name for the Entity ID may cause NetSuite errors. Additionally, since the Entity ID represents an internal identifier for the customer it's best to use a computer-generated number from Stripe instead of human readable name.
The trick is, NetSuite uses the Entity ID in many places across their UI, so using a computer-generated ID for the Entity ID makes it hard to quickly determine the actual name of a customer in NetSuite.
Customizing NetSuite Customer Data
It's possible to customize fields on Stripe-created NetSuite customers. Checkout this example for more information
Multiple Currencies
If you accept payments in multiple currencies, all active NetSuite currencies will be added to any Stripe-created customers. Here's more details on how multi-currency transactions work with NetSuite.
Updating NetSuite Customer Data
By default, NetSuite customers are not updated after they are created. There is an optional feature available to update NetSuite customer data on customer.updated or whenever a charge, invoice, order, or refund is created and associated with a given customer.
The main reason you wouldn't want to turn customer updates on is if the customer record is updated in NetSuite by other systems. Any updates made by other systems will be overwritten when the integration updates the Stripe record.
This can be a helpful feature if you are creating NetSuite customers in one system (say a SalesForce<>NetSuite integration) but you'd like future updates to be pushed from the Stripe customer to the NetSuite customer. You could do this by creating the customer in the other system, and then linking the Stripe customer either using the internal ID or a unique matching identifier.
If the external ID of a NetSuite customer created by another system does not match the Stripe Customer ID (e.g. if it's blank or another system's ID) Stripe customer updates are not pushed to the NetSuite customer. In other words, if you want a NetSuite customer created by another system be updated based on the latest data passed to the Stripe customer you'll need to set the NetSuite customer external ID to the Stripe Customer ID value.
The "Stripe Unallocated Charges" Customer
If a Stripe charge is not associated with a customer, the charge is associated with a single "catch all" Stripe-created NetSuite customer named "Stripe Unallocated Charges".
Many pre-built Stripe integrations only create a standalone charge in Stripe instead of creating a Stripe customer and then creating a charge from that customer. These sort of transactions are recorded under this unallocated charge customer.
Customer Balance
A customer's balance is not represented in NetSuite until it is used. If a invoice is partially or fully paid by a customers negative balance (i.e. think of it as a customer credit), a CreditMemo is created against the Invoice for the amount paid by the customer balance.
For example, switching to a lower cost plan results in a increase in the customer's balance, which is used to pay future subscription invoices. The Stripe customer balance can also be set at-will using the dashboard or the API.
The credit memo will not be created in NetSuite until the Stripe invoice is marked as paid. In other words, if the invoice is only partially paid by a customer's balance, there must also be a corresponding Stripe charge to account for the remaining balance of the invoice, before a credit memo is created. If the customer balance has been applied to an invoice, but there is still an outstanding amount on the invoice and the invoice is open, no credit memo will be in NetSuite. It is possible for an invoice to be fully paid by a customer's balance, and in this case the invoice will be marked as paid although there is not a charge created for the invoice.
For example, the NetSuite invoice below represents the following situation:
- $10 customer balance from switching to a lower cost plan
- $20 invoice was created, $10 of which was paid with the customer balance, the remaining $10 paid by their credit card.
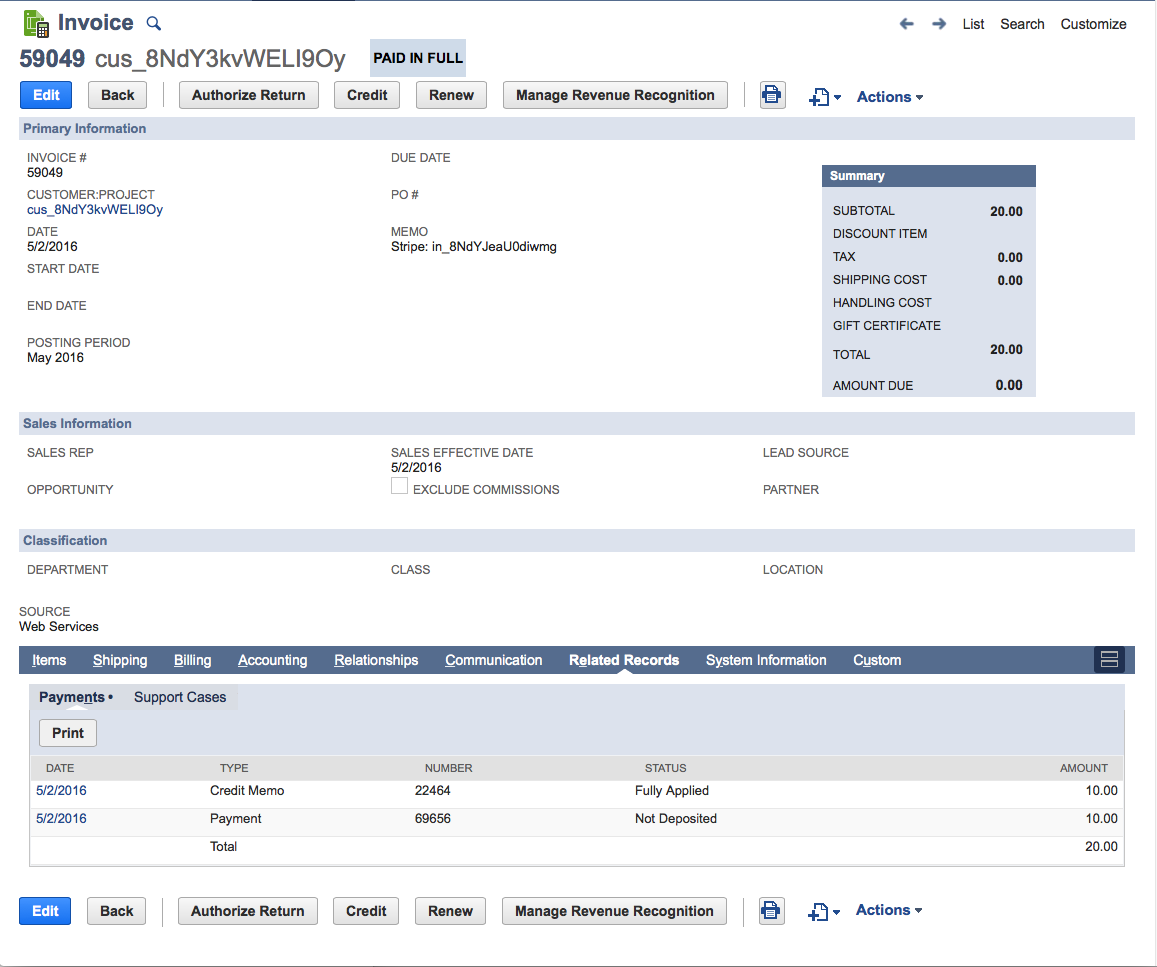
Here's the credit memo representing the customer balance:
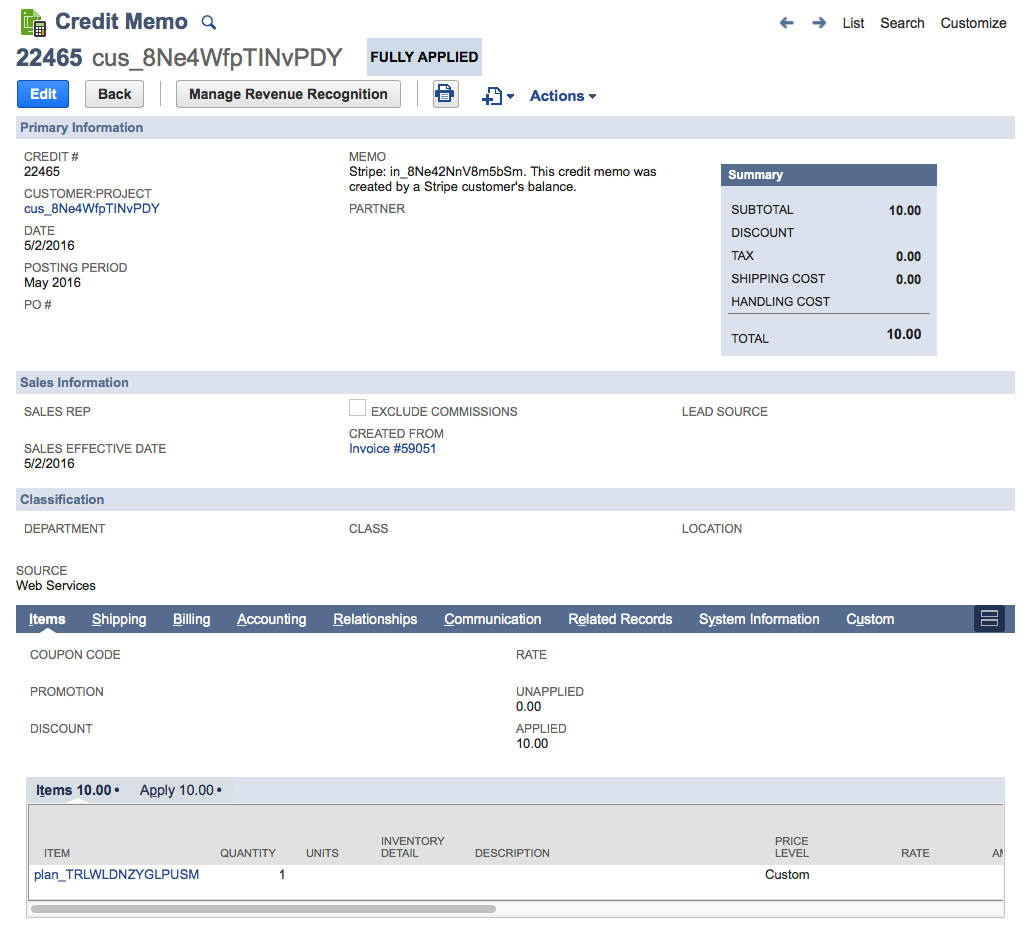
Note that if the customer balance is not used up on the first invoice created after downgrading a plan, the CreditMemo representing the customer balance will be represented by a "Stripe Customer Balance" item in NetSuite.
After the initial invoice which increases the customer balance is created in Stripe, there is no way to determine what the customer balance represents (i.e. proration, arbitrary discount for the customer, etc). Because of this, we use this unique item to track usage of the customer balance in NetSuite.
There's an option available to use a unique item for all customer balance credits. This allows you to ensure all discounts given via customer balance post to a specific GL account and allows you to run reports by item and see a breakout of the usage of customer balance.
It's possible for an invoice to increase the customer balance. For example, this often occurs during a subscription plan downgrade: the prorated unused amount on the subscription plan is greater than the amount of the prorated new plan. In this case, any amount that is leftover after covering the current invoice is added to the account balance. If this occurs, all line items on the invoice are zero'd out. This is done because NetSuite does not allow for negative invoices.
Billing & Shipping Address
If the shipping address is specified using the Stripe customer API it is added to the customer and set as the default shipping address. Here's an example of how to create a Stripe customer with a shipping address.
Here are fields that are pulled from the shipping field of the Stripe customer:
- Name. Maps to the addressee and attention fields on the address record.
- Phone. Maps to the header-level phone field on the NetSuite customer.
- Address1
- Address2
- City
- State
- Zip
- Country
You can also specify a billing address for the customer. This can be done by collecting billing address information along with the credit card data for a customer. Here's an example. Stripe Checkout can do this for you, or you can build your own billing address form. If any of these fields are set on a customer's payment source then a default billing address is created:
- Address 1
- City or Zip
- State
Note that the country field is optional. If specified, it is pulled over to NetSuite. If it is not specified, then the default country of your NetSuite account is used.
Country fields on both the shipping field and the billing verification fields should either be specified as two character codes (ISO2) or full names conforming to the ISO-3166 standard.
Creating a Individual Customer
NetSuite has two types of customers: company and individual. If you are creating a individual customer, NetSuite requires both the first and last name. There are two ways to pass the name to NetSuite:
- Using the Stripe customer
descriptionfield - Passing the first and last name separately using metadata
Here's an example of passing the first and last name over using metadata:
Stripe::Customer.create(
  description: "Sample Customer",
  email: "customer@example.com",
  metadata: {
    netsuite_first_name: 'First',
    netsuite_last_name: 'Last'
  }
)
If you pass the full name in the description field, the full name is broken up into a first and last name. The first space in the description is used to "split" the full name into a first and last name.
For instance, "Elon Reeve Musk" turns into first name "Elon" and last name "Reeve Musk". The danger with this approach is "Sir. Richard Branson" turns into first name "Sir." and last name "Richard Branson". If you collect name prefixes, you should use the metadata approach detailed above.